Reallusion’s newest plugin helps artists harness the power of Character Creator and Zbrush pose tools.

About the author
Hello, my name is Pablo Munoz Gomez, and I'm an enthusiastic 3D concept and character artist who is deeply committed to the spread of knowledge. My expertise lies in 3D sculpting, visual development, and engaging in mixed-media projects. I take immense pride in being the creator of the ZBrushGuides website, the 3DConceptArtist academy, and the 3DSnippets project. These platforms serve as outlets for showcasing my work, sharing my workflows, and assisting fellow artists in honing their skills across a wide range of subjects.

The basics
Before we begin, let's address some preliminary details. This tutorial will demonstrate the process using ZBrush 2022.0.5 version, but the plugin is compatible with newer versions of ZBrush as well. Additionally, I'll be utilizing the latest version of Character Creator 4 (version 4.3), with which I have already created a Spider-Man stylized character for this demonstration.

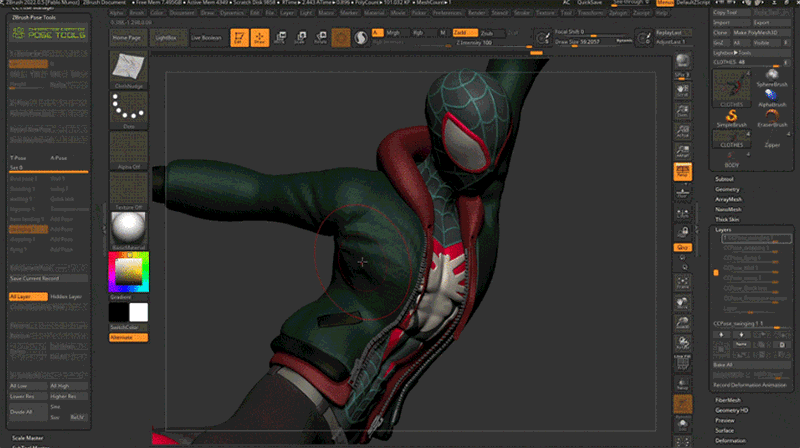
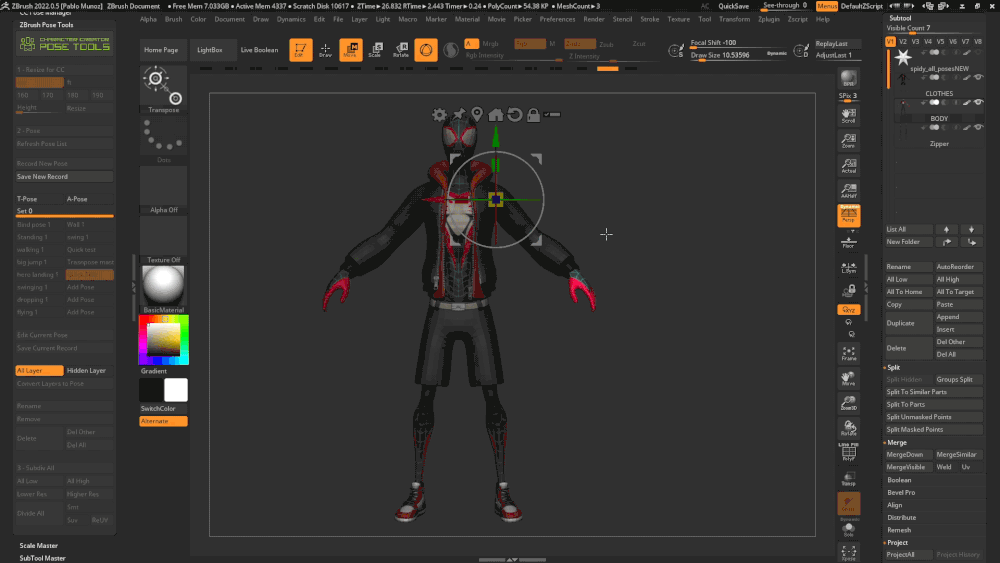
The character mentioned here is composed of three separate subtools: one for the body and one for the clothing, with an additional subtool for the zippers.
Typically, I prefer to work with a character in a relaxed symmetrical pose or an “A-Pose.” I utilize sculpting layers to introduce variations to the mesh, including different poses. For example, I can save a “swinging” pose for this character on its own layer. By enabling that specific layer, I can view the pose. However, since sculpting layers are specific to the selected subtool, I need to create a new layer for each subtool and manually toggle them on or off to reveal the corresponding pose for each subtool.

To achieve the complete pose for this character, you'll need to activate the “swinging” sculpting layer for the body subtool, as well as for the clothing and zippers. While it may not seem too challenging initially, this task can become quite tedious when you have over 10 subtools to manage.

Thankfully, ZBrush Pose Tools can greatly assist you with this task by simplifying the process of storing, editing, and managing multiple poses that involve multiple subtools. It provides a streamlined solution for handling and organizing poses, making your workflow much more efficient.
Pose Tools workflow
After installing the ZBrush Pose Tools plugin, you can locate it in the ZPlugin palette, specifically under the name “ZBrush Pose Tools.” Initially, you might notice that some options appear grayed out since no poses have been created within the plugin yet.
1. Bringing in existing poses
If you have a character with various layers already posed, you can effortlessly transfer all those layers to the ZBrush Pose Tools plugin by utilizing the “Convert Layers to Pose” button. However, it's crucial to ensure that you have correctly named each layer for every subtool. This naming convention ensures that the entire pose can be conveniently saved within a single “switch” or pose.

By simply clicking a button, the plugin seamlessly transfers all your poses into individual switches. These switches allow you to easily toggle poses on and off, enabling effortless switching between different poses. It's important to note that the versatility of this plugin extends beyond humanoid characters. You can utilize it to manage poses for any object or entity since it leverages the layer system in ZBrush. Thus, the plugin offers flexibility in managing poses for a wide range of subjects.

2. Refining select poses
Another awesome capability of this plugin is the ability to edit each relevant layer within a pose, allowing you to make precise adjustments and refine the mesh's appearance. To do this, simply select the desired pose and click on the “Edit current Pose” button. This action activates recording on the layer corresponding to the selected “switch,” allowing you to begin sculpting and make necessary modifications to achieve the desired results.
3. Creating new poses
Certainly, you have the freedom to utilize any tool within ZBrush to fine-tune your poses or even generate new poses directly from the plugin. The procedure for creating a new pose, or a new “switch,” is just as straightforward as editing or converting existing poses. Simply click on the “Record New Pose” button, provide it with a name, and the plugin will automatically create a new sculpting layer for each subtool while initiating the recording of subsequent modifications. This allows you to seamlessly capture and refine changes for the newly created pose.

In the standard workflow, you would begin by selecting or masking the areas of the mesh that you wish to protect. Then, you can employ the Transpose line or the Gizmo 3D to manipulate and rotate the relevant parts of the mesh, creating the desired pose. Once you have completed the pose, simply click on the “Save New Record” button to preserve the newly created pose.
This process can become a bit tedious when dealing with multiple subtools. However, you can simplify it by using the Transpose Master plugin. This plugin, included in ZBrush, enables you to temporarily merge all your subtools, making it easier to manipulate them collectively. The great advantage is that once you've finished tweaking the pose, you can save your changes into layers. The procedure is straightforward. Simply open the Transpose Master plugin in ZBrush and click on the prominent “TPoseMesh” button. This will create a new layer with the pose, which you can then transfer back to the Pose Tools plugin.

Now, you can create the pose for your character. When you're prepared, enable the “Layer” switch and click on the “TPose \ SubT” button. This action will transfer your modifications to the working file, including all subtools and the new pose, onto a layer. Next, simply utilize the “Convert layers to pose” button in the ZBrush Pose Tools plugin to incorporate your new pose into the switches.

4. Saving ZBrush projects
In ZBrush, there are various ways to save your progress. Personally, I find it beneficial to save multiple versions of my tools as I work on developing a concept. It's worth mentioning that when you save your ZTool and load it again on another day, you might not immediately see your saved poses in the ZBrush Pose Tools plugin. However, there's no need to worry because your poses are not lost. Simply click on the “Refresh Pose list” button located at the top of the ZBrush Pose Tools plugin. This action will scan the layers of your subtools and reconnect them to the switches in the plugin.
ZBrush to Character Creator 4 roundtrip
The ZBrush Pose Tool plugin is an excellent tool for managing poses and it significantly reduces the time required for the process. However, the most time-consuming aspect is actually creating the poses. Luckily, you can leverage Character Creator 4 with AccuRig to swiftly generate a rig for your characters, pose them, and subsequently transfer them back to ZBrush. This integration streamlines the workflow and expedites the posing process.
1. Auto-rigging ZBrush characters
For my Spider-Man character, I utilized AccuRig to generate the rig, enabling me to create a series of dynamic poses. These poses were then seamlessly transferred to ZBrush for further editing and fine-tuning. This combination of AccuRig and ZBrush allowed me to efficiently refine the character's poses and enhance their overall appearance.

I have an extensive video series on my YouTube channel and the Reallusion website that delves into the process of rigging a character using CC4. For now, let's focus on the steps involved in creating a pose in CC4 and transferring it back to ZBrush.
To begin, in ZBrush, position your character in an A-Pose and click on the “Visible” button located at the top of the Tool palette. This action will send all the visible subtools to CC4, allowing you to commence the rigging process.
In CC4, I already have the rig set up for the character, and this is how it appears:

2. Posing ZBrush characters
To pose the character, select it from the scene tab. Then, open the modify window and navigate to the posing section. Finally, click on the “Edit Pose” option, keeping in mind that this feature is only available once the character has been rigged.

You can use the pop-up window to choose the controllers for the rig and manipulate the limbs to create your desired pose. This aspect of the process is really fun, and you also have the option to utilize Reallusion's extensive library of premade poses and animations.
Once you are satisfied with your pose, you can take advantage of the convenient ZBrush Pose Link plugin from Reallusion. This free plugin is specifically designed for CC4 and simplifies the process of transferring your pose to ZBrush, automatically saving it into your ZBrush Pose Tools plugin.
To access the ZBrush Pose Link plugin in CC4, navigate to the top menu and locate the Plugins section. From there, you can select the ZBrush Pose Link option and choose “Send current pose to ZBrush Pose Tools.”

The plugin will transmit your pose to ZBrush, generating a separate sculpting layer for each of your subtools and seamlessly converting those layers into a new pose switch within the ZBrush Pose Tools plugin.

That covers the main steps. Now, you can proceed to rename this newly created pose and organize it alongside your other poses within the same ZTool in ZBrush.
To conclude the process, select a pose that you prefer among the different alternatives you generated in CC4. Then, employ vibrant and colorful lighting in Marmoset Toolbag 4 to render the chosen pose.
The render is actually something else you can do directly from CC4 and is just a matter of playing with the lights a bit.
I aimed to create a concept that resembled an illustration inspired by the movie "Spider-Man: Across the Spider-Verse." To achieve this, I imported the rendered image into Procreate and proceeded to refine the concept further by applying paint over techniques.
That concludes this article, hope you find this breakdown of the process useful!


Free Download & Webinar
Learn more :
• Pablo Munoz Gomez: ArtStation. ZBrushGuides. 3DConceptArtist (online academy)
• Posing ZBrush Character Effortlessly: CC & ZBrush workflow. ZBrush-only workflow
• CC AccuRIG: Auto Rig Tool (embedded in Character Creator 4)
Pablo Munoz Gomez is a 3D concept and character artist with a passion for education. He runs the ZBrushGuides.com website and the 3DConceptArtist.com academy along with the 3DSnippets project.


