In the latest excerpt from Maya Plugin Power, author Mark Jennings Smith shows readers how to blow things up with the Megaton or Kiloton plugins from Blastcode.

This month, VFXWorld continues a series of six excerpts of the Course Technology book Maya Plugin Power, which will give VFXWorld readers to learn how to take advantage of the myriad of plugins available to Maya users.
There is no better way to blow something up, or wreak general destructive havoc in Maya, than with the Megaton or Kiloton plugins from Blastcode. Here we take a look at how Megaton helps to generate a blast with secondary debris.
Check out Course Technology site for additional information and files.
Collision, Gravity, and Secondary Debris
The next step in the quest for a little more realism is to add some dynamic forces and create some secondary debris. Load the aforementioned red_bricks.mb scene file. We will start with this as the basis for adding our forces. If you tick through the simulation, you will see what has now become our standard wall explosion. The bricks are thrust as individuals by the explosive force. They will continue on their paths indefinitely. Let’s start by adding a ground plane to the scene. Create a polygon plane with the parameters listed in Figure 1a. Shade it any way you like. This will serve as a landing place for our bricks. Both brick wall and ground plane can be seen in Figure 1b.
![[FIGURE 1a] The plane will act as a collision obstacle for the exploding bricks. The new impact plane should have a position and dimensions similar to these.](http://www.awn.com/sites/default/files/styles/original/public/image/featured/4031-maya-plugin-power-collision-gravity-and-secondary-debris.jpg?itok=Gsuy49Ep "[FIGURE 1a] The plane will act as a collision obstacle for the exploding bricks. The new impact plane should have a position and dimensions similar to these.")
![[FIGURE 1b] Brick wall and ground plane positioned for best view of impending explosion.](http://www.awn.com/sites/default/files/styles/original/public/image/attached/4031-mayaplugin01b-fig8-34b.jpg?itok=KFoSmFbQ "[FIGURE 1b] Brick wall and ground plane positioned for best view of impending explosion.")
The first things we want to change are the trajectory, velocity, and rotation of our bricks. In the Outliner window select the BLayer1 node. In the Attributes Editor change the Debris Random Trajectory, Debris Random Velocity, and Debris Random Rotation all to .5, which can be found under the Primary Debris Attributes under the Slab1 tab, as shown in Figure 2.
![[FIGURE 2] Setting for random Rotation, Trajectory, and Velocity parameters.](http://www.awn.com/sites/default/files/styles/original/public/image/attached/4031-mayaplugin02-fig8-35.jpg?itok=5oe7UFpQ "[FIGURE 2] Setting for random Rotation, Trajectory, and Velocity parameters.")
Update Often: When entering the various tabs under the Blast window in Blast Code, it is always a good idea to click the Update List or Update Attribute button if they are available. The various lists of elements that Blast Code is keeping track of does not refresh in real time, so it’s a good habit to adopt to click these buttons upon entering a tab.
Let's add a standard gravity field from Maya’s Dynamics menu, by selecting Fields > Gravity. Make sure that everything is unselected, since you don’t want to attach it to anything specific yet. With this complete, open up the Blast window as before. Under the Particle tab are individual lists of the particles, collisions, and fields in the scene. Clicking on Update List ensures that the current list of scene elements is available to you. Select DebrisParticleShape1 from the Particles list and gravity-Field1 from the Fields list, as shown in Figure 3. Click the Attach Field button. The Bricks are now affected by the gravity field. Next we must tell Maya that a collision will occur between the bricks and the ground plane. Select the recently created polygon plane and click the New Collision button under the Particle tab, also shown in Figure 3.
The plane is now listed as a particle collider and shows up in the Collisions list as pPlaneShape1. Select DebrisParticleShape1 from the Particles list and pPlaneShape1 from the Collisions List. Click the Attach Collision button (see Figure 4a). The bricks and ground plane now interact with each other.


Save the scene. The scene file needed is called gravity_bricks.mb. Run the simulation. You may want to give yourself plenty of frames to have it play out. The results are devastating and a little unclear, but you can see in Figure 4b that some of the bricks are now landing on the ground plane.

A few adjustments will make for a better-looking animation. Select the BLayer1 node in the Outliner window. In the Attributes menu under the Explosive tab set the Magnitude, Size, and Velocity parameters to those shown in Figure 5. Let’s also move the position of the explosive force. Under the BombLocator1 tab, set the position parameters to those of Figure 6. Running the simulation should have a much more effective result and should look similar to Figure 7.


![[FIGURE 8] The Secondary Flag on and attributes set as the first step toward added realism.](http://www.awn.com/sites/default/files/styles/original/public/image/attached/4031-mayaplugin08-fig8-41.jpg?itok=0O5MviuT "[FIGURE 8] The Secondary Flag on and attributes set as the first step toward added realism.")
If you had any trouble following to this point, this scene file is saved as gravity_bricks2.mb. One final interesting step will round off this little simulation nicely. Blast Code can generate what is called secondary debris. This is quite easy to do and really adds that much-needed second layer of flying fragments. Select the BLayer1 node in the Outliner window and go to the Attributes window. Under the Slab1 tab is a section called Secondary Debris Attributes. Set the attributes as shown in Figure 8. Don’t forget to toggle the Secondary Flag on.
With that accomplished, let’s turn our attention to the Explosive1 tab in the Attributes window. The Secondary Flag must be selected here as well. This is shown in Figure 9.
![[FIGURE 9] The Secondary Flag toggled on under the Explosive1 tab.](http://www.awn.com/sites/default/files/styles/original/public/image/attached/4031-mayaplugin09-fig8-42.jpg?itok=zfpEbMyh "[FIGURE 9] The Secondary Flag toggled on under the Explosive1 tab.")
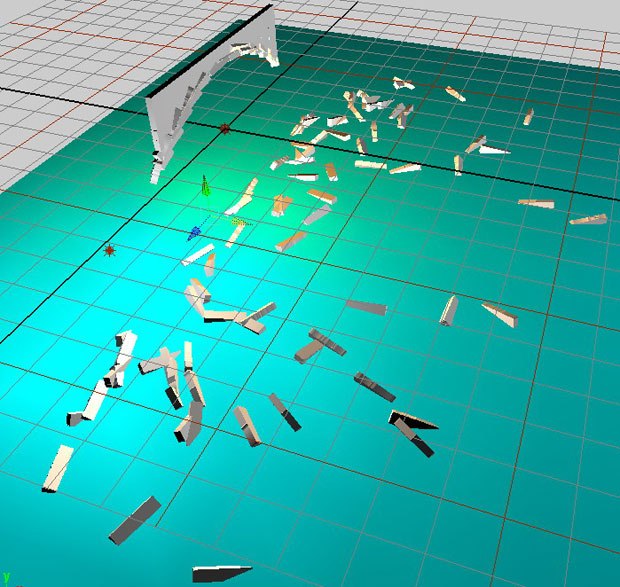
Set the Timeslider to about 120 frames and run the simulation. Stop it at around frame 40. You will notice that secondary debris has indeed been generated. It is new geometry in the scene and currently has no shader associated with it. Drag and drop the red brick shader, associated with the rest of the wall, on it as well. Rewind the simulation to the beginning and rerun it. Set the Timeslider to 200 frames. Also, select the ground plane and toggle it invisible. It won’t affect the collisions, but it will make the fragments easier to see. Run the simulation to frame 120. Figure 10 shows the secondary debris animation at frame 120.
![[FIGURE 10] With the ground plane made invisible, you can clearly see the advantage to using secondary debris for creating added realism.](http://www.awn.com/sites/default/files/styles/original/public/image/attached/4031-mayaplugin10-fig8-43.jpg?itok=7XQII_cl "[FIGURE 10] With the ground plane made invisible, you can clearly see the advantage to using secondary debris for creating added realism.")
Find the rendered QuickTime movie entitled secondary_debris.mov. If you run the movie, you will notice the secondary debris. It adds quite a bit to the overall scene. There is a problem, however. About two seconds into the animation, the bricks are adjusting to their final resting place. The secondary debris continues to pour continuously for the duration. This can be alleviated by animating the Secondary Debris Amount attribute, as shown in Figure 8. Bringing the secondary debris amount to zero between frame 30 and 60 will eliminate the problem as the generation of secondary debris tapers off to nothing. Run the simulation to frame 120. Figure 11 shows the secondary debris animation at frame 120.
![[FIGURE 11] The secondary debris now has a limited lifespan and new debris is no longer generated.](http://www.awn.com/sites/default/files/styles/original/public/image/attached/4031-mayaplugin11-fig8-44.jpg?itok=Ti2K8BOJ "[FIGURE 11] The secondary debris now has a limited lifespan and new debris is no longer generated.")
The rendered QuickTime movie is entitled secondary_debris2.mov. If you run this movie, you will notice that the secondary debris now stops at a more realistic time. It does not continue to flow long after the blast wave has past.
The power of Blast Code’s Kiloton and Megaton are waiting to be tapped. We have barely scratched the surface of what they can do. Blast Code provides a logical workflow to carry out complex destruction scenarios with relative ease. This software could easily be the focus of a specialty career. Check the Course Technology site for some additional scenes and textures for further investigation. There are other visual effects arenas to investigate, however. Let’s move on to the next chapter.
Mark Jennings Smith is a seasoned artist, animator and writer residing in Beverly Hills, CA. Smith has been fascinated by CG since 1972, when at age 10 a chance encounter with the first coin-op Pong changed his life. His interest in the entertainment field led Smith and a partner to establish Digital Drama in 1994, which focused on computer-generated imagery, animation, digital painting and special digital visual effects. Digital Drama designed the digital film effects and animation for companies such as Universal Pictures, Trimark Pictures, Fox Home Ent., HBO and Showtime. Smith has contributed to several books and magazines, including a chapter in Maya: Secrets of the Pros. He also created cover art for the book and a variety of other titles in the 3D arena. He served as the technical editor for Mastering Maya Complete 2 as well as consulted and beta-tested dozens of software packages. Smith has also taught visual effects and computer animation using Maya at New York University.


