Taylor Jessen reviews five short films: Gopher Broke by Jeff Fowler, In the Rough by Paul Taylor, Suite for Freedom by Aleksandra Korejwo, Caroline Leaf and Luc Perez, Oedipus by Jason Wishnow and A Bucks Worth by Tatia Rosenthal. Includes QuickTime movie clips!
From the General to the Specific
When you sit down to begin storyboarding your film, start with very broad strokes and work on the forest before focusing on each tree. See if you can fit most, if not all, of your story onto a single piece of paper filled with very small, loose, rough thumbnails, each one clearly representing the main action of each plot point (see Figure 15).
Consider each story action in your written script. Then close your eyes and try to imagine the clearest and most appropriate way of presenting that action visually. Whose point of view will best deliver the message of the given scene? Should the entire action take place within the space of one continuous point of view, or should it cut to different camera angles as the action continues? If your protagonist is scolding his dog, should you look over the owners shoulder to see the dogs sullen expression and tucked-in tail, or would it be better to look up from the dogs point of view to see the owners angry face? Or maybe you should cut back and forth between the two perspectives. If an action occurs where clumsy Clarence falls out of his bed in the middle of the night, you might:
![[Figure 15] Your first thumbnail pass should be fast and loose.](http://www.awn.com/sites/default/files/styles/inline/public/image/featured/2395-inspired-3d-short-film-production-storyboarding-part-2.jpg?itok=nFcW5s7i "[Figure 15] Your first thumbnail pass should be fast and loose.")
-
Stage a fairly wide point of view where the viewer can see the entire motion of Clarences fall from a single perspective.
-
Zoom in a bit closer on Clarence and then track him or tilt down as he falls.
-
Center on Clarence and let him fall out of frame. Then cut or pan down to see his inadvertent destination.
- Look up from his future destination and let him fall onto the camera lens.
Work with simple shapes and stick figures and dont worry too much about cinematic staging issues just yet. The idea here is to see your entire story as a whole before you focus on the details of any one particular scene or action. Work fast and loose. Cross out, erase and redraw as much as needed. You might even find it advantageous to start over from the beginning with a fresh piece of paper a few times. Dont feel you have to get it right the first time; just try to get an overall feel for the flow of your entire storyline in visual terms. And make sure that no matter how rough your sketches are, they are clear enough to effectively describe the corresponding action that is taking place. Explore, have fun and revisit the ever-popular why technique of editing. Apply this questioning word to each story point, making sure that its existence is absolutely necessary for your efficient and economic narrative flow.
Once you can see the flow of your story as a whole, start focusing on the individual actions of your narrative with an eye toward cinematic staging. Start thinking about the best way to present each story action and draw as many rough images as it takes to describe them effectively. Often a single panel will suffice, but a particularly complex conversation, fight scene, journey or chase might require quite a few. Use the minimum number of drawings to describe the action sufficiently. Stay fairly loose, and work on several panels on a single page. Review these images objectively, asking yourself whether each drawing or series represents the most effective and dramatic way of expressing the action of the story beat at hand.
Once youre happy with the overall flow of each action in your story, begin refining your boards and focusing a bit more attention on your ideas regarding cinematic specifics, such as composition, object and character placement, point of view and camera movement.


The Tools and Mechanics of Storyboarding
A storyboard panel is usually a rectangular frame with a designated area for notes, dialogue, or camera direction information (see Figure 16). It is not necessary to buy expensive storyboard paper at your local art supply store. In fact, we actually recommend against using the traditional white-on-black storyboard panels from art stores and catalogues. The black paper restricts you from drawing or writing outside the borders, which is often a necessary method of working out ideas. Also, your local copy center might charge you extra for making them replace their toner cartridges every time you photocopy your boards.
Usually it is more than sufficient to simply draw a rectangle or twoor fouror more on a piece of paper and leave enough space below and around each one for some written notes or informative scribbles. You might want to cut a rectangular hole in a piece of cardboard as a template so you can draw each panel at a consistent size and shape (see Figure 17). This template also comes in handy as an overlay if you want to focus on the composition of a single panel without being distracted by what is outside of its frame.
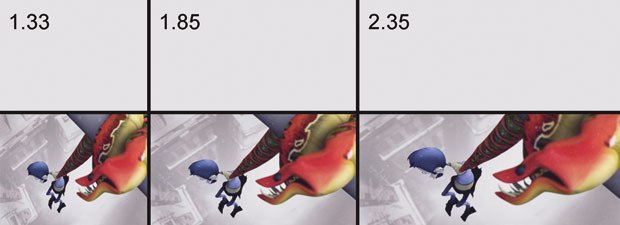
Also, consider your films target aspect ratio when you draw your storyboard panels. Standard television frames are 1.33, which means they are 33% wider than they are tall. Standard feature film frames are 1.85. An appropriate television panel might be eight inches wide by six inches tall. A film-ratio thumbnail panel might be 2 inches tall by 3.7 inches wide. You dont have to draw your storyboard panels in exact format ratios, but they should be fairly close approximations (see Figure 18).
Draw with pencils, pens, magic markers or crayonswhatever medium youre most comfortable using. Just remember that storyboarding is an exploratory process, so try to work fairly fast and loose, at least initially. You might feel the need to tighten them up for claritys sake in the future. Then again, they might work out just fine as rough sketches. Be sure to keep a good eraser and a lot of extra paper handy.
Keep in mind that you do not have to be a brilliant draftsman to board your film effectively. Often, stick figures and simple shapes will be quite sufficient to describe each shot. The most important element of a storyboard panel is clarity, not draftsmanship. However, if you want fairly refined or realistic storyboards but nobody on your team has the necessary drawing skills, consider the possibility of using photography instead. If your film is about a real or semi-real human character, use yourself or a friend with some appropriate props, a camera (preferably digital) and a tripod. Then stage your shots as live-action photos that can be scanned or digitally transferred into your computer (see Figure 19). Another non-drawing option is to create real-world 3D dioramas with action figures, toys, clay sculptures, stuffed animals and other small objects (see Figure 20). Arrange these elements as if you were creating a stop-motion stage and photograph them from appropriate angles. One advantage of this technique is that you can take a variety of different pictures of the same shot from alternative camera angles and then choose the best one later, when you assemble your boards.


You might elect to draw or assemble your boards directly on the computer using your mouse, or preferably a digital pen tablet. Any drawing or painting program will provide you with a suitable canvas on which to draw your boards. There are also a few storyboard software packages available that provide panel templates and even clip art you can use for the characters and objects in your scene images (see Figure 21). Working digitally gives you the advantage of not requiring a scanner to bring your drawings into the computer when you are building your animatics (see Chapter 7, Production Planning). Also, digital-drawing programs allow you to easily revise, repeat, rotate, mirror, scale and color your images while you work. And dont forget about the advantages of the ever-popular Undo button!


There are three main components of a storyboard panel.
-
Character, object, and background imagery and icons
-
Movement indicators
- Text
Imagery and Icons
The drawings of the characters, objects, backgrounds, cameras and lights in your storyboard panels need not be masterful works of art. As long as they clearly display all of the necessary information required to tell the story of each shot or story beat, they can be rather loose, rough, abstract or symbolic. If the proposed art direction of your film is less than realistic, then it will not only save you time, but it will actually be quite appropriate to draw your boards in a similar style. When it comes to drawing your characters, their overall gestures are usually the most important information to describe in a storyboard panel. Head orientation should also be demonstrated clearly, with at least a couple of construction lines and some rough nose and eye shapes. In general, headshots should also indicate facial expressions, even if you merely suggest the mouth and eyebrow angles with a few simple lines (see Figure 22). Depth should also be described effectively with the proper application of perspective principles, such as horizon lines, overlap and appropriately diminished object sizes. Depth can also be indicated in a drawing by using thicker lines and darker shadows on foreground elements, thinner lines with lighter shadows for middleground objects and no lines and very limited contrasts on background elements (see Figure 23).
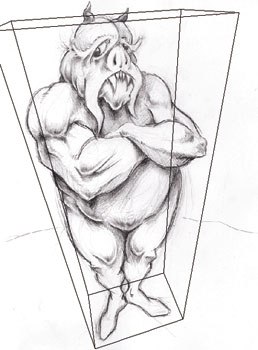
Sometimes it is even a good idea to surround more complex objects or simplified figures with lines or bounding boxes drawn in correct perspective to effectively indicate their location and orientation, especially if the current shot calls for a very low camera view or an especially wide-angle lens (see Figure 24).
Movement Indicators (Frames and Arrows)
Since a single storyboard is a static panel that represents a portion of a moving picture, it is often necessary to indicate character, object or camera movement with visual icons, such as secondary frames and arrows.
CAMERA MOVES Cut: Instantaneous transition to another point of view. Pan: Camera rotates to the left or the right from a fixed spot. Tilt: Camera moves up or down from a fixed spot. Track: Camera moves sideways. Dolly: Camera moves toward or away from the action. Zoom: Camera stays in place but the focal lens changes so the image gets larger or smaller.
Secondary frames will reveal cuts, zooms, tracks, dollies, pans and tilts. The second rectangle is often drawn inside, overlapping or next to the main storyboard panel to suggest either the initial or the final framing of a shot if it is to include a composition shift as the result of a camera move. Rotated or slightly offset secondary panels will describe twists and drifts for that handheld feel. To indicate the direction of camera movement, draw small arrows connecting the borders of the main panel to those of the secondary frame. A secondary frame without connecting arrows will indicate an actual camera cut, rather than a move (see Figure 25).
![[Figure 25] Secondary frames and arrows indicate camera moves, such as pans, tilts, zooms, spirals and combinations thereof.](http://www.awn.com/sites/default/files/styles/original/public/image/attached/2395-shorts05-25.jpg?itok=--IjyBKG "[Figure 25] Secondary frames and arrows indicate camera moves, such as pans, tilts, zooms, spirals and combinations thereof.")


Sometimes it might be preferable to use a single elongated frame rather than two separate panels to illustrate a camera pan, tilt or track (see Figure 26). If a shots camera move is rather complex, it is a good idea to draw a corresponding arrow or path line next to the storyboard panel, representing a top view of the cameras intended trajectory.
Large arrows will indicate the motion of the characters and objects in the scene. Arrows should be drawn three-dimensionally to clearly indicate the specific direction of motion you are planning, especially when depth is involved. It is also usually beneficial to label these arrows with respect to the specific character or object to which they are referring (see Figure 27).


Text
Words can be used to indicate dialogue or narration, which might be written in a separate panel beneath the main board, in a comic-book-style balloon within the image itself or simply scrawled between quotation marks wherever there is room on the page. You can also use text for descriptive notes indicating specifics, such as camera motion velocity, and details that are difficult or inefficient to indicate in static drawings, such as sound effects, the flowing movement of a grassy field, necessary historical information or the number of times your protagonist will snap his fingers. And using text and arrows between the borders of two storyboard panels is an effective way of describing continuity, wipes, fades or camera movement details (see Figure 28).
Diagram Panels and Numbering
The images weve been describing and illustrating thus far are known as cinematic storyboards, which represent the approximate staging, composition, and action that will ultimately be seen from the camera and audience point of view. Another type of storyboard is a diagram panel, which shows a particular shot from an alternative point of view, typically from above, with arrows and simple icons representing cameras and objects. These panels are often used adjacent to (or sometimes in place of) cinematic boards to more effectively describe camera, character or object movement, especially when complex or depth-oriented trajectories are intended (see Figure 29).
Also be sure to label each board with its corresponding scene and shot numbers. If a gust of wind or a rambunctious child disturbs the panels youve so carefully laid out on the floor, youll have a relatively easy time putting them back where they belong if they are labeled appropriately. Number your shots sequentially. If you find it necessary to insert a new shot between CB14 and CB15, you can label it CB14a. It is generally a good idea to write your scene and shot numbers in pencil so you can erase them if you decide to do some major plot restructuring.
And, as you draw and label your storyboard panels, record a complete shot list on a piece of paper or in a piece of word processing or spreadsheet software. This way, you will have an overall shot list prepared when it comes time to budget and schedule the production of your film.
Exercise: Watch one of your favorite animated shorts. Pause after every shot and draw a quick thumbnail with appropriate movement arrows, frames, and descriptive text. Then analyze your complete set of boards with regard to composition variation, point of view, camera angles and moves. How does the director use different shot types to effectively stage his story actions? Is a particular shots point of view from an omniscient and objective cameraman, or from an actual member of the story? Does the film have too many of the same types of shots in a row? How much actual camera movement exists? Are extreme angles used, and if so, do they seem appropriate for the dramatic content of the particular scene? Does the camera ever distractingly cross the line of action?

Shuffleboarding and Shot Shaving
You will repeatedly edit your film as it evolves. When you initially wrote or recorded your script, hopefully you went through it with a fine-toothed comb and pruned out or tightened up any pointless or unnecessarily long scenes and actions. The storyboard stage represents yet another excellent opportunity for you to make a story-editing pass.
Layout all of your boards on a wall or on the floor and review your film as a whole. Previously, you examined the overall flow of your story when you created your first rough thumbnail pages. Now, when your boards are a bit more refined and contain preliminary ideas for cinematic details, such as composition, POV and camera moves, you will likely find it quite revealing to look at your story again as a complete and continuous visual experience. You might find it necessary to shuffle individual boards or even entire scenes to deliver a particular story point with a bit more effectiveness or dramatic flair (see Figure 30). Perhaps the earthquake should happen while Larry is proposing to Mary, instead of right after he proposes. Maybe your heros argument with his mother-in-law will have more dramatic impact if you start with a close-up and then pull wide, rather than the other way around as you had originally planned. Use your objectively critical eye and look for what works and what does not work cinematically.
-
Are there too many over-the-shoulder shots?
-
Do any shot sequences break the line of action inappropriately? If so, can you fix the problem by simply mirroring a particular storyboard panel?
-
Are you unnecessarily establishing the same locale with multiple shots from alternative camera angles, where one would be more than sufficient (see Figure 31)?
-
Are there any shots that do not hook up properly with their neighbors?
-
If a car is traveling left to right in one shot, do you have it moving right to left in a subsequent shot, in which it is supposed to be continuing in the same direction?
- Does your camera jump back and forth between wide shots and close-ups too repetitively?
![[Figure 31] Look for cinematic structure problems, such as redundancies (multiple shots establishing the same setting) and repetition (close-up, wide-shot, close-up, wide-shot and so on).](http://www.awn.com/sites/default/files/styles/original/public/image/attached/2395-shorts05-31.jpg?itok=we67wtiU "[Figure 31] Look for cinematic structure problems, such as redundancies (multiple shots establishing the same setting) and repetition (close-up, wide-shot, close-up, wide-shot and so on).")
Look at every storyboard panel and ask yourself, Why is this shot in my film? Every shot needs to directly contribute to a story beat that subsequently contributes to character development or plot progression. Any shot that does not fit this criteria needs to be cut. Establishing shots are only appropriate if it is necessary to show locale or perhaps set a mood. Sometimes a sequence will work just as well (if not better) when the setting details are vague, abstract or even entirely absent. If a particular shot was planned for the sole purpose of showing off that beautiful texture map you painted on the bottom of your protagonists shoe, it should be left out unless it somehow moves the story along. Try to indicate transportation by using shortcuts. Show your characters getting into the car, then perhaps show a single shot of the vehicle heading down the roadway, and then show a shot of the arrival. Only fill in extra shots along the way if you need to indicate that a long distance is being covered or if an important conversation or action takes place during the journey.
![[Figure 32] Consider holding a pitch session with a few select friends or well-respected colleagues.](http://www.awn.com/sites/default/files/styles/inline/public/image/attached/2395-shorts05-32.jpg?itok=wwJjh_xJ "[Figure 32] Consider holding a pitch session with a few select friends or well-respected colleagues.")
If a shot does not contribute to the narrative flow or character development that ultimately leads to your storys conclusion or punch line, cut it.
When you are happy with this new visual representation of your story, consider holding a pitch meeting with a few select individuals (see Figure 32). Walk your viewers through your story by describing the action, dialogue, or narration of each shot and story beat while flipping through your boards one at a time or pointing to the appropriate one on the wall. Try to elicit some constructive feedback with regard to the structure, composition, pacing, and clarity of your cinematic vision. If anyone is unclear about a certain story point, it may or may not necessarily indicate a story problem. That specific plot point might simply need an alternative or extra storyboard panel in order to be described more effectively. Or perhaps an audience member sneezed during your presentation and missed an important piece of information. Then again, there might indeed be a flaw in your story structure. Discuss the unclear section with the person who mentioned it and see whether you can work together to identify the source of the confusion.
Remember, if you are going to need to make significant changes to the details of your cinematic vision, sooner is always better (and cheaper) than later.
Summary
A storyboard sequence is like a comic-book version of a film. The storyboarding process will allow you to work out the beats of your story visually and begin exploring ideas for cinematic details, such as composition and camera moves. A story beat refers to an action or event in a narrative, while a shot is a cinematic term used to describe the delivery of a story action from a single (but not necessarily static) point of view. A single shot might contain several story beats. Likewise, a single story beat might need several shots to be delivered effectively. Every shot in a film tells a miniature story. The main action of this story must be storyboarded. Many types of shots exist, including close-ups, over-the-shoulders and birds-eye views. Point of view changes should take place when it is necessary to show a new or existing action from a more appropriate perspective. Pay attention to traditional composition principles when staging your shots. Always think in terms of continuity when you are working out the visual representation of each shot and story beat. Initial storyboards should be small, rough and loose, allowing you to experiment with the overall flow of your story before you hone in on the details. The main ingredients of a storyboard panel are character, object and background imagery; movement indicators, such as secondary frames and arrows; and text used to indicate dialogue, narration or direction specifics. There are two types of storyboard panels. Cinematic boards represent an action from the cameras point of view. Diagram boards show an action from a non-camera POV, often from above, with simple icons and arrows representing objects, cameras, and their corresponding trajectories. Use the storyboarding process as an opportunity to further edit your narrative flow. Arrange all of your boards on a wall or on the floor and then analyze your story as a whole. Cut and rearrange as necessary to make sure that your story is dramatic and entertaining. Look for story and future cinematic issues and try to work them out in this less expensive pre-production stage. Make sure every shot and story beat directly or indirectly contributes to the flow of your story by analyzing each storyboard panel and asking yourself, Why is this scene in my movie? And consider pitching your film to a few select friends by walking them through your storyboards.
To get a copy of the book, check out Inspired 3D Short Film Production by Jeremy Cantor and Pepe Valencia; series edited by Kyle Clark and Michael Ford: Premier Press, 2004. 470 pages with illustrations. ISBN 1-59200-117-3 ($59.99). more about the Inspired series and check back to VFXWorld frequently to read new excerpts.
 and Pepe Valencia.")
Jeremy Cantor, animation supervisor at Sony Pictures Imageworks, has been working far too many hours a week as a character/creature animator and supervisor in the feature film industry for the past decade or so at both Imageworks and Tippett Studio in Berkeley, California. His film credits include Harry Potter, Evolution, Hollow Man, My Favorite Martian and Starship Troopers. For more information, go to www.zayatz.com.
Pepe Valencia has been at Sony Pictures Imageworks since 1996. In addition to working as an animation supervisor on the feature film Peter Pan, his credits include Early Bloomer, Charlies Angels: Full Throttle, Stuart Little 2, Harry Potter and the Sorcerers Stone, Stuart Little, Hollow Man, Godzilla and Starship Troopers. For more information, go to his Webpage at www.pepe3d.com.


