Barbara Robertson speaks with Lucasfilm cto Cliff Plumer to find out more about the technology of the future from someone at the forefront of innovation.
Many of SOFTIMAGE|XSI 5.0s enhancements and features are a direct result of user requests, such as updated rigid body dynamics, 64-bit XSI, migration tools for Maya users, ZBrush compatibility, bézier curves, laptop layouts, dopesheet improvements, weight locking, shape manager. Others were a very welcome surprise such as, rendering speed and memory improvements, Ultimapper, GATOR, tweak tool and more.
64-Bit XSI
Possibly the best thing to happen to XSI users who work on gigantic scenes is the 64-bit version. It dramatically improves performance. No more out of memory errors or scenes that just dont work because youre stuck with a 32-bit piece of software. Tests show that the 64-bit version of XSI can handle scenes with a billion polygons and thousands of textures. Not that you would want to work on a scene that large, but if you had software that could, imagine how well a typical scene would run.
Rendering Memory and Speed Improvements
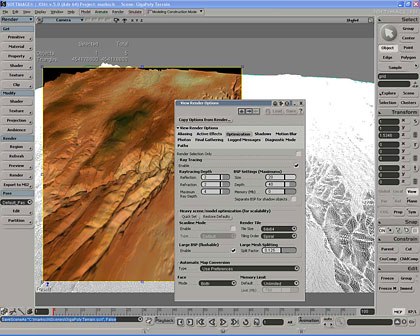
Part of the new Gigapolygon core, rendering in XSI 5.0 is about scalability, and mesh splitting is just one part of a major undertaking to ensure that large scenes will render faster and more reliably. Softimage has introduced new geometry compression as well as XSI render callbacks, which will only push a minimal amount of data to mental ray, and only when a ray hits geometry will it call back XSI for the relevant data.
In addition, there should no longer be issues with requiring large lumps of contiguous memory to achieve any of this, as XSI will break large objects up into pieces can be flushed when memory usage is low and call it back later. Complementing this is a new tiling option (again mainly useful for very dense meshes), which will work for the render region as well as when rendering to disk. Ultimately, this now means that when you can load it into XSI, it renders. All these new features are present in both the 32-bit and 64-bit versions. Plus XSI 5.0 has integrated mental ray 3.4.6 just about as closely as is possible. This is one of the reasons its able to render so many polygons at once.
As for .mi files, they are generally smaller (around 10 times) and now use subdivision geometry shading as well as the callbacks. This development work is almost all under the hood and does not require the user to fine tune, tweak and jump through hoops to simply render large scenes. Again, all these new features are present in both the 32-bit and 64-bit versions.
Rendering & Texturing
There is a new material port node for fast subsurface scattering and skin shader. It seems to render much faster than previous versions.
Pass Channels
You can automatically generate standard or custom rendered channels such as specular or reflections.
Render Options
Some of the new render options include: Multiple final gathering bounces, final gathering density control and the ability to filter color for global illumination, caustics and final gathering.
There are also loads of new animatable functions in the Render PPG. Jitter Sampling now has a slider, not just on/off. Photon GI and Caustics now have an RGB filter. FG Bounces now has a slider and so does Pre-Sampling Density. Automatic Compute now has a filter. Logged messages have check boxes rather than levels, allowing you to show only errors or only progress etc Export MI2 now has subdivision geometry shaders export options.
Companies at IBC that announced new products or upgrades to products in the DI and data-centric space included Quantel, Autodesk, Digital Vision (which acquired Nucoda earlier this year), Assimilate, MTI, Imagica, Celco, Bluefish444, Zaxel and FilmlLight. Actual product announcements detailing the new software, hardware and systems can be found at each companys website.
Lightmaps
Lightmap shaders can be attached to materials to sample the object that the material is attached to, and compute a map that contains information about the object. The most common application is sampling illumination, or just indirect illumination, and storing it into a writable texture file that can be texture-mapped later during rendering. This makes rendering much faster, although the illumination contribution is now frozen into the object and cannot change with changing lighting conditions.
Modify>Projection
There are come cool new projection tools like inspect current UV, inspect All UVs, swim (allows editing geometry without distortion) and reproject.
Ultimapper
The new XSI Ultimapper tool can generate all kinds of cinematic-quality maps from arbitrarily complex models in just a few clicks all the while taking full advantage of all the sophisticated rendering possibilities of the mental ray v3.4 rendering engine. Ultimapper can generate normal, ambient occlusion, difference, light and albedo maps all with an instant mental ray, DirectX or OpenGL preview directly in the XSI view-ports.
Texture Editor
There is a new Multi object display in the texture editor allowing you to see many objects UVs at the same time. The snap tools work across different UVs making lining up textures much easier.
New Ambient Occlusion Shader
Ambient Occlusion illumination shaders are now built into the package. No need to hunt down one on the net. This AO shader uses a fast and computationally inexpensive technique to simulate the effect of global illumination. It works by firing rays into a predefined hemispherical region above a given sampled point on an objects surface in order to determine the extent to which the point is blocked or occluded by other geometry.
RenderMap Updates
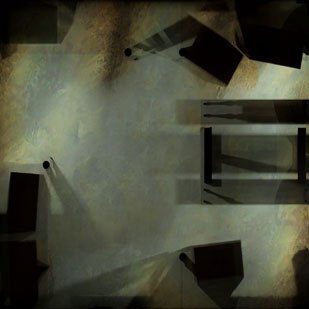
The RenderMap property has been updated with additional options for generating Surface Color maps. The available surface color map types are now: Surface Color and Illumination: bakes all object surface attributes, including color, illumination and bump into the rendermap output image. Surface Color Only (albedo): bakes object surface attributes, including color and bump into the rendermap output image, but does not include illumination information. Illumination: bakes illumination information into the surface color map. This includes light color. Illumination maps can optionally include bump map information. Ambient Occlusion: uses XSIs ambient occlusion shader to create a color representation of the extent to which the object is occluded by other objects, or the environment, at any given point. Ambient occlusion maps can optionally include bump map information. A subset of the ambient occlusion shader options appear in the RenderMap property editor to give you some control over the occlusion map. There are also new options for toggling a variety of surface attributes (bump, shadows, ambient and diffuse lighting) included in the surface color map.
Maya to XSI Migration Tools
With so many Maya users picking up XSI, I think it is a good move to include many of the subtle features that Maya users look for in a package. It also allows XSI users to take advantage of some of the workflow that Maya users experience with all of the beauty and grace of XSI. Some of the migration tools are simple, like keyboard shortcuts or interface adjustments, while others are totally new features included in XSI just for Maya users.
Tear off Menus
These are menus that you can separate from the rest of the application allowing you to drag them anywhere in the application. While you could do something like this in previous versions of XSI using toolbars, this implementation is much easier.
Transform Groups
Transform Groups is another get-the-Maya-user-to-XSI type of feature. In Maya, you use groups to perform what you do with nulls in XSI. Traditional groups in XSI are used for a long list of totally different functions.
Keys and Audio Waveforms in the Timeline
You can view and edit keys in the timeline similar to how you do in the dopesheet. The advantage of doing this in the timeline, of course, is that you dont need to open up a separate editor: the keys are right there. This lets you keep the object that youre animating in full view at all times. Also available is an audio waveform view. Making it much easier to synch up keys to specific audio events.
Parameter Connection Editor
Those who use Maya will recognize and utilize this feature immediately. (Connection Editor/Set Driven Keys) Most XSI users are constantly using link-withs to custom property pages to accomplish this sort of functionality.
Dragging Windows Outside of XSI
This is not really a Maya Transition tool, but is a very welcome addition. A simple but new feature that allows you to drag windows outside the XSI workspace.
Miscellaneous
Dedicated keymaps for common commands, based on QWERTY keys. New optional panels to create familiar layouts. Enhanced shelf customization, with optional icons. Display hotkeys for the current viewport. Manipulators or directional handles for objects and components. There are more Maya to XSI tools in this release of XSI. But, rather than list them twice, Ive decided to go over them a little more in-depth later on in the review.
Modeling
ZBrush Compatibility Options Softimage has realized that many users love to model in ZBrush. As a result, the OBJ importer has been enhanced with many new ZBrush specific options such as: ZBrush image file, Alpha Depth Factor, Vertical flipping option, View dependent refinement, Subdivision level.

Fold Deformation
There is a new deformer tool called Fold. Fold wraps the extremities of an object toward an axis. You can control the axis, the type of fold (linear or spherical/cylindrical) and the degree of folding in the primary and secondary planes. This sort of tool makes creating paper airplanes or origami out of grids pretty easy.
Drawing Bézier Curves
There are new commands to draw cubic curves with Bézier knots. It is easy to break and align tangents on Bezier knots and manipulate curves in a Bézier-like manner. In addition to Bézier knots, you can manipulate non-Bézier knots, control points and isopoints. You can also raise the degree of curves. For example, you can convert a linear curve to a cubic in order to add a curved segment to it. The existing trace is preserved when you raise the degree.
Editing nurbs curves in XSI 5.0 has become almost freeform. In combination with the new tweak mode, you are no longer limited to editing curves only by moving CVs. In addition to directly manipulating knot points and Bézier handles, click anywhere on a curve and an edit handle will appear giving you local Bézier-style manipulation control.
Subdivision Surfaces - Loop Subdivision
With the Catmull-Clark and linear subdivision methods, you now have the option of using Loop subdivision for triangles. The Loop method subdivides triangles into smaller triangles, giving better results than quad-based methods.
Subdivision Surfaces and Texture UVs
There is a new option called Smooth when subdividing in the Texture Projection property editor. You can unset this option to maintain compatibility with other 3D software that does not smooth the UV coordinates when subdividing.
Tweak
This tool lets you pull points, edges, polygons, weld points and slide components along the surface of your model. With one key you can move, rotate, scale or translate points, edges and polygons. as well as loop and range select any component or even slide your selection to match the position of its neighbors exactly. It features optional component manipulators and quick manipulation planes making it simple to work to your own artistic rhythm.
Emboss Geometry
Emboss geometry that displaces geometry in the viewport rather than at rendertime. It is animatable and can take animated sequences. Embossing geometry is just a part of the new possibilities; basically, all operators that could only connect to a weight map can now connect to any cluster property, including UVs+texture, color at vertices, user normals or even shapes and envelope weight props.
DotXSI v.5.0
XSI v.5.0 includes the full dotXSI import/export source code! DotXSI allows your content and game engine to speak the same language by enabling full access to arbitrary custom data, multiple attributes per vertex and realtime shader effects.
New dotXSI Export/Import options in the SDK examples. New mesh structure in dotXSI file format to support multiple normals/vertex colors. New template for user data blob support. SRT FCurves now under the SI Transform template for consistency. Faster Export/Import of dotXSI (approximately 50% increase in speed.) Faster animation plotting. Support for exporting geometry from geometry approximation subdivision level. Support shapes properly (as in, export shapes plotted or real shapes). Better overall feedback of export and import process (verbose mode + meaningful progress bar). Automatic plotting of global SRT animation into local SRT animation.
Miscellaneous Modeling Tools
There is a new tool called View Plane Proportional Transform that allows proportional manipulation without proportional needing to be turned on. New bias and new ability to use with points, edges and polygons (R + Middle click to change radius). The bias controls the falloff that can help moving more points closer to the source selection. The Modify object pivot tool uses the alt key to move the pivot point. There is also a tool that transforms hidden objects. When you create a Polymesh or a Surface Mesh, there is a new option to generate automatic UVs. There are new options in the Merge tool for envelopeanimation shapesUVsetc preservation. No more data loss! Shrinkwrap now has new closest pointsurface options. Grow selection has a new counterpart, shrink selection. You can now generate automatic UVs from lofts and extrusions. There is a new Use Loop subdivision scheme for triangles. This new subdivision rule option will give smoother results on triangulated objects. Note: You can mix Catmull-Clark and Loop schemes on same object. Try doing Catmull Clark on triangluated object without this and you will soon stop, as it looks not so hot. And, for the handful of people that still use Nurbs, youll be happy to hear that Nurbs to Mesh now supports trims.
Animation
Cycle Checking There have been various improvements to cycle checking particularly in terms of speed. In addition, there is a new option Disable cycle checking when applying animation operators on the Scene Recovery tab of the Data Management preferences. This suppresses checking for evaluation cycles when creating constraints and expressions. This may be useful for avoiding unwanted warning messages in some types of rigs where cycles are desired. Note that cycle checking is always performed when applying topology operators, connecting weight maps and moving operators.
Dopesheet
There are significant improvements for the dopesheets like the ability to set different settings in different dopesheets. Easier cut, copy, past ( Shift-left click to select a key or shift-drag to select a range) and a handy right click context menu.
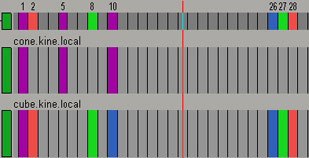
The dopesheet now has a summary track that shows the keys for all objects displayed in the dopesheet. This makes it easy to branch-select a whole character to display the keys on all animated parts. Or branch-select the scene root or a model node to display all keys on all objects in the scene or model to retime the entire animation. As with other collapsed tracks, purple keys represent overlapping keys, and RGB keys represent the XYZ keys for the transformation parameters.
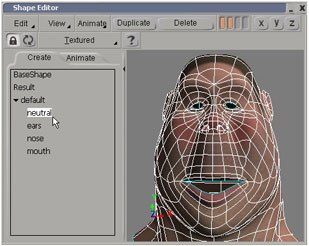
The Shape Manager
The shape manager provides you with an environment for creating, editing and animating shapes. To help you work efficiently, you can see the results of the changes as you make them. In this editor you can: Adjust base shape or result, keyframe options for all shapes, create groups for sliders, match construction mode level and all the other things you would expect to be able to do with shapes.
It boils down to this: fast, non-destructive modeling and animation workflow for shapes. It is a single environment to create, manage and animate a library of shapes. At any time you can edit your original base shapes, create a hybrid-blended shape or view it with additional deformers such as envelopes. With the shape manager there is no need to create separate geometry for each shape (morph target), dramatically reducing dependencies and complexity.
Parametric Curve Constraint
Before, we only had constrain to curve by percentage. Stretch any part of your curve and everything constrained to it would have to shift. Parametric constrains to the U-positions along the curve. You can stretch a portion of your curve and it only affects elements constrained close to that portion of the curve. This is important for many kinds of rigging setups where you might want to keep a head and tail locked down while you move the mid-section, which is not possible with the old style curve constraint.
FCurve Editor
Snapshot curve function in the FCurve Editor where curves persist after an object change or a window closing. There is new color-coding (in the dopesheet as well) and now a frame number right on the time cursor.
Save Key
Save key options are for the K Key. Like keyable parameters displayed in keying panel, save key using marked parameters (XSI Default), save key on all keyable parameters and save key on all marked keyable parameters.
Keying Panel
Maya users will be familiar with this as their channel box. XSI had marking sets, which are now replaced with this new, more powerful workflow.
Removing Static (Flat) Fcurves
The new Remove Animation from Static Fcurves command removes fcurves that have no animation on them anymore (fcurves that are flat or static).
Offsetting the Audio While Scrubbing
This option is a toggle that changes the audio behavior when scrubbing the playback cursor forward in the timeline, which can help you synchronize your audio with the animation.
Locking Envelope Weights
You can lock or hold the values of envelope weights to prevent them from being changed. Locking prevents you from accidentally modifying points that you have carefully adjusted when you are working on other points. It is also useful for setting exact numeric values while keeping Normalize on so that points dont inadvertently become partially weighted to no deformer. Note: There is more advanced control of locking weights in the weight editor than whats available in the envelope menu.
Chain Element Display Size and Shadows
You can change the display size of bones, roots and effectors. There are several new display shapes available for these elements and their shadows. You can change the color of the shadows. You can add a shadow to any null object.
GATOR
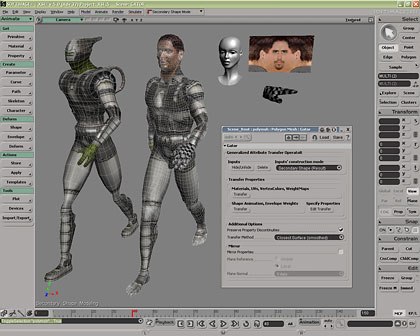
What is GATOR? Simply put, GATOR ROCKS! Here is what it is and why: There is a new tool called GATOR (Generalized Attribute Transfer OperatoR.) It is used for transferring attributes between objects. Based on the closet pointsurface of one objects over another. It is very easy to use, simply align two objects, select one and launch picking session.
It does sooo much. For example, with this tool, you can copy any shape animation onto another geometric object without worries about having the same amount of polygons. It can also transfer UVs, materials, textures, clusters and envelope weights from any number of poly or nurbs meshes to any other poly or nurbs meshes. It can mirror properties during transfer and does discontinuity preservation. One of the coolest features of this tool is that it preserves UV discontinuities as you transfer from one object to another.
What is revolutionary about this tool is that GATOR is a *LIVE* operator. Once you assign it, its live until you decide to freeze it. That means, you can link the envelope weights or UV maps from a very low res mesh onto a very high-res mesh, and tweak your settings on the low res mesh, all while seeing the resulting effects on the high res mesh... in realtime. At the SIGGRAPH Softimage user group, they did some transfers between some pretty wacky topologies, and everything worked flawlessly, much to the audiences amusement.
GATOR, in combination with XSIs work modes, is an unbelievably powerful tool. Its implementation provides resolution independence for your workflow... work at any resolution you want and transfer over to any other resolution you want, at whatever phase of your pipeline you want. It provides a gateway for easily building your own pipeline to stamp out varieties of fully enveloped creature rigs from a single source template, without having to write a lick of custom code. Since the operator is live, you can use the transfer effect from multiple sources as a rigging or effects tool.
Simulation
New Dynamics Engine Softimage has added a new Dynamics engine (Ageia PhySx, previously called NovodeX), which is far superior to the previous one. Ageia PhySx physics simulation allows for complex Hard body simulations using complex polygonal shapes. At SIGGRAPH, Softimage demonstrated this by showing hundreds of chairs bouncing off of each other and accumulating in a sink at the bottom of the scene. Performance in this engine is boasted to be up to 100 times faster than in previous XSI releases. However, they did not remove the old (ODE) engine. You can choose which one you want to use from a dropdown list.
Ageia, the PhySx company, is also the creator of the PhysX Chip, a PPU (Physics Processing Unit), a GPU for physics, if you like. An XSI compatible accelerator board should be out in the near future, which will speed your simulations up even faster than they already are.
This chip not only accelerates RBD, but also soft body, fluids, hair, wire and cloth. The PhySx SDK also includes a Particles API. While XSI takes advantage of just the Rigid Body Dynamics portion of this technology, one can only assume that other areas of XSI will utilize it in the future. Its already there, why not use it?
The PhySx engine includes new Convex Hull collisions, an intermediate step between primitive collision and actual shape collision, which provide better performance than actual shape. New PMap Actual Shape collision type. Options for actual shape resolutions. UI changes to collision layers. Setting initial states automatically at the first frame and UI changes to collision layers.
Also of note is that Sony and AGEIA have entered into a sublicensing agreement. Through this agreement, SCEI obtains sublicensing rights of the AGEIA PhysX SDK (NovodeX), the physics library developed by AGEIA. The licensing agreement allows for SCEI and AGEIA to optimize the AGEIA PhysX SDK for utilization in PlayStation 3, and will be included in the Software Development Kit for PlayStation 3. Frontline support will be provided by SCEI. Its nice to see that XSIs native RBD system is the exact same one that the PS3 will be using. This should save a few game programmers and artists some time down the road.
Brushing Hair
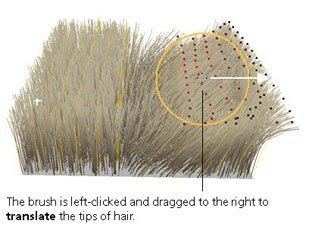
Brushing grooms the hair with a proportional modeling brush, allowing you to intuitively sculpt the hair in an overall manner. With proportional modeling, hair points closest to the brushs cursor (the crosshairs at the center of the brush radius) are affected the most while those farther away are affected less, according to the distance falloff. Not only does it work with hair, but it also works on any geometry, including particles.
Replacing Render Hairs with Objects (Instances)
Replacing hairs with objects allows you to use any type of geometry in a hair simulation. You can replace hair with one or more geometric objects (referred to as instances) to create many different effects. Simply put the objects you want to instance into a group, then each object in the group is assigned randomly to a guide hair. The instanced geometry is calculated at render time so youll only see the effect in a render region or when you render the frames of your scene.
This really is just objects instancing on hairs like particle instancing, but the objects can be deformed by the hairs! The nice thing is that XSIs hair driven object instances are full 3D and will be rendered with the rest of the scene and, contrary other similar systems, appear in reflections, are affected by 3D fog, etc.
Cloth
Advanced users will get Syflex3 cloth and flesh integrated for free with their version of XSI.
Particle Goal Offset
You can offset the goal objects target so that the particles dont aim exactly for the target as they move toward the goal.
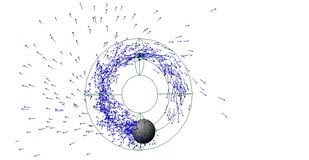
Toric Force
The toric force is similar to an eddy except that it is in the shape of a torus (or donut, if you prefer). It simulates the effect of a vacuum or local turbulence by creating a vortex force field inside the torus. Anything that is inside the torus, is affected by the force. This force is useful for making billowing effects in smoke simulations or having particles sucked through a tube to follow a path (if the torus is open-ended).
Interface
Cool Interface Stuff There is a new 1024 X 768 layout, which is mostly for people with laptops. When you change a key mappping, the new key automatically appears next to the command in menus and context menus. The new UI for deleting layoutsshelves and old toolbars is very handy. There are new view switchers in MCP, which toggle between the MCP and a Key Panel/Layers layout. There is a view switcher located at the bottom of the left of the interface that switches between four viewports, two viewports, an animation layout, a user layout and a render tree layout.

There is a new Main Shelf shelf and new VM Views toolbar. You can change a button label and width. There is a new way to add a script button without referencing external file (script embedded in XML file). There are also new top menu and module switching controls.
All menu controls have been reduced in size, leaving lots of extra space for adding your own custom toolbars and menus. The top menubar has been modified to resemble the left side toolbar in both form and function. Also new is the ability to have optional panels, which can be hidden, which allows for the UI configured to suite all tastes.
Nudging
You can nudge elements to translate them by a very small amount. (No longer a script!)
User Keywords
You can add keywords to namable elements such as objects, clusters, materials and so on.
Determining the License Required by a Scene
The element of the element in the scene TOC file contains the license required by the features used in the scene. This information is useful if you want to batch-render scenes on a farm that has a mixture of licenses.
View Plane Pivot Transform Tool
The View Plane Pivot Transform tool lets you translate, rotate and scale both objects and components using the mouse pointer as the pivot. It can be used with proportional modeling as well as snapping.
Camera Navigation
There are some new camera navigation options like adjustable mouse mapping, the ability to use the ALT key for navigation, orbiting around selected components with out framing first and adjustable pan/orbit speed.
Layer Control Options
The old layer control has a received a make over making the workflow more streamlined, it also now includes the ability to lock and color the layers.
Output Format Preferences
The Output Format preferences provide access to a variety of camera, image-format and other parameters that are normally scattered throughout several other property editors. You can modify all of these parameters from the Output Format property editor, and then apply the changes to all applicable parts of the scene. This allows you to quickly make global changes to the most common settings, such as those required to switch from the NTSC picture standard to the PAL picture standard.
Scripting/SDK
Script Editor There is a new external editor option in the scripting preferences and a new feature that logs verbose messages. The Show command hyperlinks feature turns all your commands in the scripting pane into links. Click on the command and a window pops up, telling you all about that command. (It links to associated line errors found in scriptsplugins.)
Script Errors
When you get an error there is a link to the file. If you click on it, you will be taken straight to where the error is. Also, there is a large red error bar at the bottom of the interface that screams error and tells you where your problem is. There is also a much larger space for command logs here so you can see the entire error message or a more detailed command log message without having to open the script editor anymore.
SDK
There are a lot of new SDK examples. If you are using XSI5, you can try them out by connecting to the sdk workgroup. Some of the examples have been released in the past but theyve all been given a facelift in terms of documentation and ease of installation. Be sure to check out the XSIGame samples.
Integrated Tools Development Environment (TDE)
A TDs dream come true a single unified development environment to create, manage and deploy all tools, plug-ins and workgroups. The TDE contains multiple script editors each with syntax help, breakpoints and external debugging links and includes a tree-based Add-On manager with the ability to create self-installing shaders, events and plug-ins from development wizards using standard scripting languages or directly in C++. Develop inside the TDE and enjoy the refined workflow that XSI artists have enjoyed for years.
The control windows for the TDE, such as the Plugin Manager, have vastly improved layouts making it easier to scale and scroll them without losing access to buttons and functions. (It used to be really annoying trying to work with these GUIs because they were huge and refused to be scaled down without hiding buttons!)
Miscellaneous
There is a new tree-based system for managing, deploying, and packaging all tools and a new shader wizard. There are new self-installed events and drag and drop SPDL, Plug-in and Toolbar deployment as well as advanced diagnosis information for plug-in errors and conflicts.
Theres a new custom command wizard that opens when you drag and drop script text onto a toolbar. It gives you the option of embedding the script code right into the toolbars description file, or linking to an external file as before. You can also set custom button dimensions and provide your own Tooltip text or Bitmap image source. Basically it gives more easy options to non-technical users who like to create their own tools from their command histories.
Verbose logging: The preference is off by default so that normal users wont see such messages. You can add verbose logmessage calls into your scripts that provide additional technical information to help you debug or oversee the operation of a plug-in, without slowing down a normal installation of XSI or frightening a user.
New PointLocatorData SDK API: people have access to part of GATOR and shrinkwraps guts: fast to get closest surface values and evaluate properties at any location of a NURBS or polygon mesh. New GeometryAccessor SDK API: easy and scalable access to mesh and subdivs data, including clusters and cluster properties (used in the new dotXSI).
More Miscellaneous
Reference models persist constraints and there is a new RefModel_PreModSave option. Workgroup based toolbars are new editable and custom mental ray shaders can be installed on any workgroup with out restarting XSI after install. XSI 5 now includes Behavior 2.1, which is an updated version. Not really a feature of XSI, but the new version of mainwin seems to make XSI more Linux friendly. (It seems to work much better with unsupported distros.)

Face Robot
Face Robot is a special projects tool from Softimage that isnt a part of any of the three price points currently available to XSI users. Its a standalone product, still in development, but could likely become integrated into the general software after it has been ground through the production grinder. Face Robot is a true muscle/tissue based simulation that actually approximates the skull, muscle and sinew under the flash surface. Based on an approximate musculature of the face, the software allows the user through an interactive gui based pick session to define key points on the face. Models are adorned with tracking points from which were generated the control system for the entire face. Pull on the control points and its amazing to watch the mesh accurately slide over the underlying tissue. Softimage also hinted that this technology will extend beyond just facial animation. Body Robot anyone?
Blur Studio uses this tool to produce a huge amount of very high quality facial animation in an extremely short time span. By their calculations, they were able to produce a finished second of facial animation in one hour, with the performance results surpassing expectations.
The system implications go much further than animation productivity and quality. The number of facial MoCap points has been severely reduced saving significant time and difficulty in the point placement process and the post cleanup work (not to mention money on spirit gum, or whatever they used.
Is this something that will be available to the masses? My impression is, probably not at first, but definitely down the not too distant road. History has shown this to be the case with other technologies developed by special projects.
One more thing: For anyone out there quick to mention any of the various existing facial animation systems, I should tell you now that while these systems offer some nice tools for time saving and efficiency, not one of them comes remotely close in performance results per unit of work. Keep in mind that these other programs have been in development for years and what were seeing from Face Robot is just the first cycle. Its only going to get better from here. The bar has been raised, and that can only be good for all of us.
Ed Harriss is a 3D artist/technical director working at Alternate Route Studios in North Carolina. He is a Softimage expert and very well known in the community for his Softimage Learning Tools and his book How to Get a Job in CG. He also writes for several online and print magazines and is forum moderator on XSI Base.com.
