Discover the foundation of arcs and in-betweens in 3D animation.

This is the next in a number of adaptations from the new Inspired series published by Premier Press. Comprised of four titles and edited by Kyle Clark and Michael Ford, these books are designed to provide animators and curious moviegoers with tips and tricks from Hollywood veterans.
This excerpt focuses on the fundamental and technical aspects of creating effective arcs in your actions. Further discussion on their relationship to actual performance can be found in Chapters 17 and 18 in the book Inspired 3D Character Animation. One must understand both the technical and artistic nature of animation in order to produce quality work.
The fundamental theory regarding arcs took a stronghold in the animation community and became a standard for all traditional 2D and stop-motion artists. Those traditional artists know the importance of maintaining this principle in order to produce quality work. This fundamental remains an important part of the current processes. However, its translation into digital technology hasnt been an easy one. As youll see, managing this important aspect of character movement isnt that easy.
There is a certain amount of laziness in letting the computer do the work because it is relatively easy to get something to move. If you think in terms of the traditional animator, he does not have this luxury; he must draw every arc needed. There is a lesson to be learned from this approach. Ive seen both novice computer animators and seasoned industry veterans fail to pay attention to their arcs. To be honest, Ive done it myself more often than Id like to admit. Taking a lesson from the traditional animators, I learned to set a few more key frames, because if I fail to pay attention to the arcs that create a natural sense of movement in my characters, the performance suffers.
Different actions have different degrees of arcs in their motions. For example, the swinging of an arm has a fairly noticeable arc between its forward position and rear position. Conversely, a head turning from side to side has a much more subtle degree of an arc as it traverses. Ill break down some of these exercises in greater detail later in the chapter, and give you some examples of how I use these different types of arcs in my animated characters. First, Ill show you what arcs are and how they apply to animation.
arc n. A curved or semicircular line, or direction of movement or arrangement of items.
Arcs
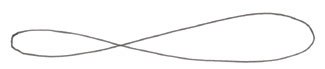
According to Websters Dictionary, an arc is simply a continuous portion of a curved line. When most people think of an arc, they think of the perfect 180 degree arch on a building, but an arc can also be represented by a figure-eight or just about any other continuous curved line.
The discovery of arcs in human movement can be traced back to the early 16th century and the master artist, scientist, and inventor, Leonardo da Vinci. Through careful dissection, da Vinci was able to uncover the true shapes and internal workings of the human body. More importantly, however (at least for our discussion), Leonardo did not simply observe these structures; he became obsessed with how they worked. This led to the first accurate knowledge of body mechanics and human movement. Because all animation is created with movement, you can see the importance of this work.
By analyzing how the bones attached themselves, the idea of arcs in motion was uncovered. da Vinci observed that the limbs and spine, like any moving object, attached at one end (similar to a pendulum) and moved around the axis of its attachment. Because the joints of the body are attached with a ball and socket (able to rotate on all axes) or hinge joint (only able to rotate along one axis), the resulting path of movement would be curved in nature. The spine is the exception because it derives its movement from a series of specialized joints compressing on discs allowing it limited but flexible motion. Another revelation that came out of this tendency toward curves (and one that applies directly to high impact anima-tion) is that these joints were simply unable to make angular, linear motions. Again, LIVING OBJECTS CANNOT PERFORM ANGULAR LINEAR MOVEMENTS.
To illustrate a ball and socket joint, simply stand with your arm fully extended at your side, with your palm facing your thigh. Keeping your arm fully extended, lift your arm perpendicular to your body with your palm facing the ground. If you were to draw a line tracking the movement of the fingertips, you would notice that the path in which your hand traveled can be drawn as a 45-degree arc. For a hinge joint, lay your arm out in front of you with your palm facing up, and bend your elbow toward your shoulder. This motion also creates an arc defining the movement of the hand.
The non-linear path an object takes from one position to another can be defined visually by the representation of an arc. (See Figure 2.) This arc, or curved segment, is present in large movements as well as the slightest motions. From the swaying action of a blade of grass to the sweeping movements of an elephants trunk, every character or object that maintains an organic sense of motion incorporates arcs.
![[Figure 2] A simple arc diagram.](http://www.awn.com/sites/default/files/styles/inline/public/image/attached/1828-02-02.jpg?itok=EX3ht05U "[Figure 2] A simple arc diagram.")
There are exceptions to the rule, of course. Remember, I said anything natural operates with the use of arcs. Things that are mechanical have the ability to move in a linear fashion. The pistons in a car engine, the needle of a sewing machine, and the shaft of a drill press all move in a straight line. These devices have structural restrictions and a set of hand-made devices that force their motion along one axis. Its important to understand the limitations of mechanical movement, but it is equally important to understand that an object that possesses life will never be able to move in such a way. The objects and characters discussed here will be organic and, therefore, move along arcs.
As animators strive to create more believable characters in films, games, commercials, and shorts, they must be careful to replicate the organic movements they observe every day. The circular path created from a turning head or a swinging arm is a detail that must be incorporated into an animated scene.
The concept of arcs dates back to the earliest days of Disney animation when the animators discovered that their characters took on a whole new sense of realism when proper arcs were followed on all moving parts. They began charting and planning their keys with notations included for arcs to ensure their performances maintained the genuine motion they so desired. (See Figure 3.)
![[Figure 3] The plotting and drawing of arcs helped the animators stay on the proper path.](http://www.awn.com/sites/default/files/styles/inline/public/image/attached/1828-03-03.jpg?itok=CEylps2K "[Figure 3] The plotting and drawing of arcs helped the animators stay on the proper path.")
The Computer and Arcs
Although 3D technology has many great things to offer, one of the things it doesnt have an easy solution for is proper motion arcs. Artists cant rely on software by itself to generate acceptable paths between key frames. When two key frames are set, the computer creates the shortest path between those points. The software is designed to specifically translate between two given values. Its solving that equation in the most efficient manner possible. Obviously, animation isnt about efficiency, its about making choices that will create a performance or an action. Youre looking to solve that space in between two key frames in the most natural and artistic way, regardless of the effort. By paying attention to the path along which an object moves, you can correct the computers tendency to create linear paths.
Ill give you an example: Im going to animate a character throwing a Frisbee. His right arm needs to make a smooth arc as he swings to release the disc. Ive set a key at the beginning and end positions, frames 1 and 32 respectively. The top view provides an excellent place to watch the resulting action. As I scrub through the scene, the computer calculates the resulting path that the arm will take. A snapshot from the middle of the action clearly shows that the computer has made an undesirable path of motion.
The solution to this problem is actually quite easy. If I add a few extra keys, the arm will swing in a more natural arc as it releases the disc. Ill begin by setting an additional key on the wrist controller at frame 16. (The proper placement of this in-between pose will be discussed later. This position is just to demonstrate the idea of generating an arc.) Extending the hand outward at the frame will result in a more natural translation between the first and last keys.
Ultimately, this action will require additional keys in order to achieve the optimum arc. However, its clear that the computer alone cannot create this motion (at least not yet). One additional key frame makes a significant difference. Several more and the character will swing his arm in a fluid, organic motion. Now, let me show you how proper arcs are determined.
How to Track Arcs
Many off-the-shelf packages have utilities or techniques for tracking the path of action. There is, however, a simple and efficient way to accurately trace the route an organic object should travel.
This approach does not employ technology, but instead uses the method that I prefer over any script, plug-in, or custom utility. It begins with the use of a dry erase marker, which is an inexpensive pen that can be bought at most office supplies stores. The dry erase marker originally was developed to write on erasable white boards, but can be used on any smooth surface. The ink can easily be removed with a dry towel. Im going to be marking on the computer monitor with these pens and its imperative that you use this type of marker. Trust me, you wont be happy (nor will the studio) if you use a permanent marker.
Take the example of a character waving his hand to get someones attention. This is a broad motion that has a well-defined arc. The hand will require some special attention and several keys to keep the path of action desirable. The dry erase marker will assist in this process and ensure that the animator doesnt stray from her goal.
Ill begin by setting the two extreme poses. These keys will involve one pose at the left of the wave and one at the right. As with the Frisbee toss, scrubbing through the scene shows a hand traveling along an inaccurate trajectory. This is not difficult to correct. Just as a traditional animator might sketch in the arcs for his assistant, I can use the dry erase pen to indicate where the next set of key frames needs to be set. (See Figure 4.)

 [Figure 4] (left) The arc is indicated with a mark on the computer screen. [Figure 5] (right) The poses are set in accordance with the sketch. Tick marks provide additional information to the whereabouts of my keys.
This mark provides a template for the remaining keys that will be set. I can begin setting the in-between poses making the wrist conform to the sketch on the screen. In addition, tick marks at the various key frames give me an indication of the spacing of my poses. Each time a key is added, Ill make an additional tick mark with the pen. Now there is a visual representation of how the arm is articulating and I can adjust the keys accordingly. (See Figure 5.)
As you can see, having the proper arcs and paths of action (especially in computer animation) is crucial. Setting those additional keys in-between major poses is essential. In-betweens put the control in the animators hands, where it belongs, and as I will show you next, impact the accuracy with which the characters move.
The In-Between
To accomplish the refined movements of the characters Im animating, its important to understand the term in-between. This term refers to the parts of animation that occur between the defining poses of a scene. Animators can set these additional keys or the computer can interpolate and create the motion for you. Regardless of their origin, these in-between key frames directly affect how the motion appears.
Like many of the other fundamentals discussed, this technique dates back to the early days of hand-drawn animation where the animator would lay out the key or extreme poses. After those drawings are completed, a second artist would be responsible for adding the in-between drawings based on timing charts and notes from the animator. These additional drawings created the necessary transitions to create a fluid movement with natural arcs.
As you can see in Figure 6, the in-between poses influence the quality of arcs that characters and objects move along. The examples, however, have yet to take into consideration the sense of weight and timing. In-betweens have a direct effect on both.

 [Figures 6a and 6b] (top) [6c and 6d] (bottom) The in-between drawings in a traditional scene are shown above. The first and last images are the keys and the two drawings in the middle are the in-betweens.
I discuss the idea of timing in Chapter 8, Timing, and lay out the fundamentals behind creating strong arcs in the previous section. Its now time to consider both aspects of motion and begin to unravel how the two co-exist in the same scene. To do this, I look to the in-between.
Referring back to the Frisbee throw from the previous section, I remember the computers inability to create ideal arcs. The next step was setting a few extra keys so the hand would have a natural feel as it propelled the disc forward. Although the hand now traveled on a more favorable path, it lacked the necessary force to give it a sense of weight.
In-betweens, if properly placed, can create both a circular path and a believable amount of force. Characters need a certain amount of time to begin and end an action. This particular scene doesnt call for an excessive amount of time to move the arm forward, but will most certainly require a weighting of the keys at the beginning of the motion.
The in-betweens need to be placed so that the accelerating arm will ease out of its initial starting position before thrusting forward and releasing the Frisbee. The current keys are set at frame 1 and frame 32. Im going to place an in-between key at frame 16. However, instead of placing the arm directly between the first and last positions, Im going to place it toward frame 1.
The key will result in the arm taking half of the 32 frames to move 1/3 the total distance. This will create an easing out of the move and will give the perception of the body actually projecting an object that has some sense of mass and a deliberate force behind it. How much force will depend on the character, of course. A different character of the same size, throwing the same object will have a new set of in-betweens, arcs, and timings. This example is not intended to be a timing lesson; rather, it is intended to show how the in-between keys will have an effect on both the timing and arcs in a motion. Although this one additional key has an impression on the action, a few more are required.
The shot is now approaching a somewhat desirable result. However, the computer still has too much influence on the throw. The arcs arent quite right, and the timing is a bit flat. The next in-between Ill set will occur at frame 6. Im placing this key closer to frame 1 to continue with the concept of easing out, and to help watch the arc thats required. Ill also need to place another key between frames 16 and 32 for the same timing and arc control.
This trend would continue until the desired animation was achieved. The coupling of both arcs and timing is a constant factor when animating a scene. Both must constantly be monitored in order to achieve the best results. By approaching a more complicated action from start to finish, I can get a complete picture of the importance these fundamentals have. The next section takes a look at such an example.
Exercise: The Arm Swing
One thing you can always count on in animation is the character walk cycle. One of the most difficult parts of a walk is the arm swing. Its a complex motion that relies on a complete understanding of the principles already discussed in order to be successful. Proper arcs, an understanding of timing, and appropriate movement along multiple axes are all equally important.
Although there are many variations on how an arm can swing, Im going to explain a technique that I often rely on. Its referred to as the figure-eight due to the resulting arc generated from the hand traveling along a path of this shape. (See Figure 7.) This is a generic approach, but can be modified to fit most any walk.
The example is being presented as a cycle in that the arm starts and stops at the same position. When played, the arm will appear to make a smooth transition from front to back for as long as the animator desires. This allows for proper dissection of the motion and lets the reader see both directions of the swing completely. It begins by setting a few simple keys.
The first poses that will get key frames are the two extremes. These two keys will define the farthest distance forward and backward that the arm will reach. Keeping the arms extended in these positions helps sell the breaking of the elbow as the arm moves in the opposite direction. In addition, these keys provide a framework for the subsequent in-between poses. (See Figure 8.)
![[Figure 8] The two extreme poses for the arm swing. The back positions are keyed at frame 1 and frame 24. The forward position is set at frame 12.](http://www.awn.com/sites/default/files/styles/original/public/image/featured/1828-inspired-3d-character-animation-arcs-and-betweens.jpg?itok=eGiQre4d "[Figure 8] The two extreme poses for the arm swing. The back positions are keyed at frame 1 and frame 24. The forward position is set at frame 12.")
The main positional keys are being set on the wrist controller of the arm. The arm setup contains the same controller configuration as discussed in Chapter 4, Tools of the Trade.
The next step is starting to layer in a few in-between keys. Their position is determined by the distance the arm will have to travel and the amount of acceleration and weight that is desired. Remember, the heavier an object, the more effort it takes to get it to move; therefore, it takes longer to get it moving. For this character, Ive chosen to place the first set of in-betweens at frame 6 and frame 18. These two positions are a quarter of the way toward their goal in half the time they have to move that direction. The result is an arm that eases out then accelerates quickly to its target.
Along with this relation to distance, I must not forget to keep the keys on the proper arc. They currently lie on a sweeping path from front to back. Minor adjustment might be necessary after future keys are layered in. However, they are positioned at a good starting point.
The current keys have established a basic standard of timing. Their position is creating the proper ease out and acceleration when moving from both front to back and back to front. As I continue to layer in additional in-between keys, it becomes increasingly necessary to concentrate on the path of action the arm is taking. The next few steps are a bit more complex but are needed to create a proper arm swing.
As the arm swings forward, it must continue on a circular path. The arm continues on an upward motion as it breaks back toward the body. This is a big point of confusion for many people. This action starts the first breaking of joints as the limb begins its back swing. The following image shows a sequence of keys that illustrate this point.
A similar arc occurs at the high point of the back swing. The arm makes a small circle as it begins moving back toward the front. Two in-betweens are required to make the tight transition. Ive placed them at frames 2 and 4.
The arm swing now has all the necessary elements of a believable action. The hand swings along a rounded, organic path and the proper in-betweens give the appearance of weight and acceleration.
Arcs and in-betweens are key fundamentals to keep in mind when animating your scenes. They must be implemented in order to create refined and believable animation. There is little room for shortcuts when entering this level of refinement so you must take control of the software and prevent the computer from making decisions for you. Be conscious of the effort and attention to detail required to produce a believable performance, both physically and emotionally and, of course, the most important rulemake it perfect.
To learn more about character animation, walks, tools of the trade and other topics of interest to animators, check out Inspired 3D Character Animation by Kyle Clark; series edited by Kyle Clark and Michael Ford: Premier Press, 2002. 268 pages with illustrations. ISBN 1-931841-48-9 ($59.99) Read more about all four titles in the Inspired series and check back to VFXWorld frequently to read new excerpts.


Author and series editor Kyle Clark (left) and Series editor Mike Ford (right).
Series editor Kyle Clark is a lead animator at Microsoft's Digital Anvil Studios and co-founder of Animation Foundation. He majored in Film, Video and Computer Animation at USC and has since worked on a number of feature, commercial and game projects. He has also taught at various schools including San Francisco Academy of Art College, San Francisco State University, UCLA School of Design and Texas A&M University.
Series editor and author Michael Ford is a senior technical animator at Sony Pictures Imageworks and co-founder of Animation Foundation. A graduate of UCLAs School of Design, he has since worked on numerous feature and commercial projects at ILM, Centropolis FX and Digital Magic. He has lectured at the UCLA School of Design, USC, DeAnza College and San Francisco Academy of Art College.


