Continuing our Inspired series, this excerpt continues on the issue of animation blocking.

All images from Inspired 3D: 3D Character Animation by Kyle Clark, series edited by Kyle Clark and Michael Ford. Reprinted with permission.
Read Part 1 of Inspired 3D: Blocking Your Animation.
This is the next in a number of adaptations from the new Inspired series published by Premier Press. Comprised of four titles and edited by Kyle Clark and Michael Ford, these books are designed to provide animators and curious moviegoers with tips and tricks from Hollywood veterans.
Adding More Information
The next part of this process incorporates a more refined level of animation. Its going to build on the quick pass and create animation that clearly defines the intentions of the scene.
To get the desired quality of animation, Ill need to add details to the gestures of this scene. The first pass generally concentrated on a small number of controllers. For the most part, I left the arms, head and chest in the default position. This stage requires setting keys on most major skeletal attributes. These additional keys will not only refine the level of poses, but will also allow me to precisely delineate the timings of the scene. These polished timings should bring a sense of weight, emotion and intent to the 3D character.
Although I am adding a large amount of detail to the previous pass, it is import ant to remember that this is the blocking phase of animation. The scene is still in its infancy and changes are going to happen. Staying away from the intricate details of poses will ensure that modifications can be made easily. Items such as fingers, facial features and clothing shouldnt be introduced until the base layer of motion is established. (Unless these items are crucial to the shot.) In addition, keeping a certain degree of tidiness to your scene is important. By keeping the data organized, making timing adjustments will be much easier.
Im going to start by working on the initial 18 frames of the shot. The quick pass consisted of only two frames and some additional info is necessary. The character is in mid-stretch during this time. I m going to have him complete the end of a stretch and then hold that pose for six frames. Hell move a short distance between frames 1 and 12 and then drift slightly to frame 18. The small difference between the poses at frames 12 and 18 (the drift area) will keep the character alive. Figure 7 shows the three frames.
![[Figure 7] Frames 1 (left) through 12 finish the stretch while frames 12 (center) through 18 keep the character slightly moving. The small change between 12 and 18 (right) provides a nice drift for the character.](http://www.awn.com/sites/default/files/styles/original/public/image/attached/2091-i3d0717-07.jpg?itok=UNfLcJfK "[Figure 7] Frames 1 (left) through 12 finish the stretch while frames 12 (center) through 18 keep the character slightly moving. The small change between 12 and 18 (right) provides a nice drift for the character.")
[Figure 7] Frames 1 (left) through 12 finish the stretch while frames 12 (center) through 18 keep the character slightly moving. The small change between 12 and 18 (right) provides a nice drift for the character.
On a quick side note, some extra consideration was necessary for this first shot. The geometry of the set was moved around. This required the beginning position of my character to change slightly. It also forced me to pay attention to the bookcase in the scene. Ill have to watch my poses as the character begins his next set of actions.
The next beat from the blocking is frame 74 the ending point for our characters turn. Looking through my thumbnails and video reference, I notice the character needs to make a 100-degree rotation. This requires small steps from both the left and right leg, so the majority of my initial effort s will be spent getting this action correct. Ill add upper-body poses at a later stage. I dont want to spend too much time working on the shoulders and head when the hips and feet havent been addressed. Those lower-body sections drive the animation for this scene.
I begin by getting the feet and corresponding hip locations laid out. A complicated action such as this requires me to get up and down from my chair for additional research on how the body is behaving as it turns. I also have to keep in mind that the character is somewhat groggy. That tired feeling is going to affect the timings of the turn. The characters left foot moves first. It lifts up at frame 24 and then plants at frame 31. The right foot remains planted until frame 31, lifts to frame 40 and plants at frame 50. The left foot has one small step that begins at frame 50, lifts to frame 55 and plants at frame 60. The body finishes its rotation by frame 74. Figure 8 shows the sequence of poses.


 [Figure 8] The step and turn poses for the lower body.
While the steps were being placed, I paid special attention to the location of the hips. Although fast, I want this phase of the animation to be as clear as possible. If you refer to the previous figure, youll notice that the hips remain over the static leg when the character lifts a foot to step. In frame 55, for example, the weight is over the characters right foot until the left foot is planted. The hips will move after the left foot is touching the ground at frame 60. Keeping the proper balance at an early stage helps to better communicate the physicality of the character. The more believable the character is, the better the impression a director or supervisor can get from your work.
A quick render shows that the timings and locations are pretty close. Although a lot of work remains to be done on the feet and hips, this should be a good start. It s time to add some upper body poses for the turn. The scene currently has keys at frames 1, 17, 24, 31, 40, 50, 55 and 60. Im going to generate keys on the chest, head, and arms at those same frames. This should keep my keys consistent, which again will help me if future changes are required.
As I begin to create poses, special consideration is given to the idea of lead and follow. As discussed in Chapter 6: Force: Lead and Follow, every action has a driving or initiating force and a complementing reactionary force. In the case of this turn, the hips are leading the chest, which in turn is driving the head and hands. If I keep that concept in mind when setting key frames, the character will be more believable.

 [Figure 9] Frames 31 and 60.
Figure 9 shows two upper body poses for the turn. Notice the lead and follow built into each pose. For example, frame 31 shows the hips already beginning their turn while the shoulders drag behind. You can see that same idea applied at frame 60. The arms are swinging around as the chest is slowing to a rest.
Try to keep track of the arcs associated with each pose. Making the arms flow correctly between each frame is important. I must continually switch between the top, side, front and perspective views to ensure that the wrists stay on track.
The turn is nearing a level of quality that I can live with. Its time to complete the blocking portion of this shot and move on to sf02 and sf03. The remaining 47 frames of this shot are a bit less complicated. I have the stretching motion to screen left and then a stretching motion to the right. Im going to spend a little time creating poses for both actions. Similar to the first few frames, there is a long pause at both of these positions. Its basically another moving hold. Based on the timings from the quick pass, I ll add keys to controllers at frames 80, 90, 101, 115 and 121. Figure 10 shows the two major poses.

 [Figure 10] The stretching frames.
Ive tried to push the exaggeration on both sides of the stretch. However, I usually find myself not going far enough. Ill probably end up working a bit more on the pose when I move into the refinement stage. Also, as these keys are being created on the low-res character, Im not necessarily seeing the exact representation as it will appear in the high-res rig. Ive also paid attention to the silhouettes created with these two frames, and Ive even taken some of the cube geometry into consideration. I dont want the characters hands or head conflicting with anything from the background. Now on to the close-up shot.
This particular shot didnt receive much attention during the blocking pass. However, setting a few keys will be necessary here. You might wonder why the character is going through a yawn motion without closing his eyes. This shot will eventually require facial animation (Ill talk about the specifics in Chapter 18). For now, however, Im going to concentrate on getting the head and chest working. Ill begin with the last frame from sf01. Remember, Im cutting on action and need the shot to sync up.
The initial motion of the head is screen right to screen left. The character is starting a big yawn at the beginning of the scene. His head begins at frame 1 and travels to its extreme left position by frame 32. These two keys would certainly create a head turning from left to right, but you know from the chapter on arcs that organic objects dont travel in a straight line. Im going to add a key at frame 17 to create a more natural shift in the head. This additional key will also allow me to create a more believable ease out from the heads starting frame. Ill rotate the head so it favors the initial position instead of the halfway point the computer created.
Now that the head has reached its extreme rotation toward screen left, Im going to add 12 frames of moving hold. That means Ill adjust the head a small amount so that it continues moving just enough to keep it alive. The head should continue to travel in the direction it was going. Figure 11 shows the first four keys in this motion. In addition to creating the slight drift, these 12 frames serve an even bigger purpose: They prepare the audience for the large headshake that follows.
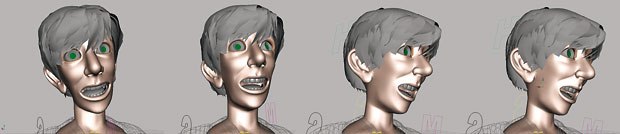
replace_caption_i3D11_17-11.jpg
One of the biggest considerations for this shot is the anticipation for the violent action. Im going to be shaking the characters head back and forth in an effort to wake him up. A large exaggerated motion such as this demands plenty of anticipation. Remember, the bigger the action, the bigger the anticipation. Nine frames should be ample given the context of the scene.
The headshake begins at frame 44. The head is currently rotated to it s extreme screen left position. The first move occurs in 4 frames and hits on frame 48. This action is relatively quick and includes a sizable move. To lessen the abruptness, Ive placed a key at frame 50 thats slightly different from 48, which helps soften the drastic change.
The head moves back to the characters left at frame 54 and back to the characters right at frame 58. These two positions are followed by keys at 62 (characters left) and 65 (characters right). Notice I didnt include the two-frame buffer that was placed on the initial rotation from frame 44 to 48. These successive motions arent nearly as large. In fact, each transition from left to right is smaller with each successive shake. The result is a fading out of the shaking.
As with the previous shot, Im also paying attention to the forces involved. Although they are not as visible as the characters turning body, they are just as important. There is actually a large contrast in the two shots in terms of which section is leading the movement. In sf01, the hips were in charge. They pulled the shoulders and head around as the body twisted. In sf02, however, the head is driving the action. Its pulling the shoulders as it traverses back and forth. That means Ill have a slight delay in the chest region. If the head reaches its extreme at frame 44, the shoulder will follow behind and hit at frame 47. The end result is an overlapping of action between the two sections creating a more organic and natural movement.
Sf03 will receive similar treatment creating more refined poses, attention to forces, arcs, and refined timing. One thing to note about this shot was the addition of a leap as the character enters the chair. Storyboards, reference video, thumbnails and quick pass all called for a traditional method to sit in the chair. However, after beginning the scene, I thought it could use some more exaggeration. Figure 12 shows the results of that change. I will go into further detail with this shot in Chapter 18: The Finishing Touches.


 [Figure 12] The new method for sitting down incorporates a jump.
Now that youve worked through the three actions, Id like to point out a few things. The first is the complexity of the actual scene file. Ive stripped this scene down to its basic components in order to render and update the shot more efficiently. There are minimal props, and the character still remains in the lowest detail possible. These items dont affect the current state of the animation and enable me to quickly render the scene for viewing.
Second, Im working fairly quickly as I place the character in each position. The resulting poses will require some modifications and I should have plenty of time to include further detail during the refinement stage. Im mainly interested in communicating my intentions for the scene and generating enough information to show the characters emotions.
Third, Im not paying too much attention to the curves these key frames are creating. With the exception of a few minor tweaks to avoid slipping, I rarely open the editor and adjust the values. Im concentrating on modifying timings in the dope sheet and relying on the perspective, front, side and top camera views.
When your shots clearly show all the elements given to you during turnover, the director, supervisor, or lead will begin to see your work. It is here that the changes begin. This is a common part of production and one that all artists and animators must expect. If youve approached your shots as described in this chapter, you should be in a position to make changes quickly. There will definitely be times when entire shots need to be re-worked. Often this occurs after you have just saved what you thought was the final version. Understanding that change is likely and keeping your scenes well organized will allow you to easily address both minor and major changes in direction.


Author and series editor, Kyle Clark (left), and series editor Mike Ford (right).
Series editor Kyle Clark is a lead animator at Microsofts Digital Anvil Studios and co-founder of Animation Foundation. He majored in film, video and computer animation at USC and has since worked on a number of feature, commercial and game projects. He has also taught at various schools, including San Francisco Academy of Art College, San Francisco State University, UCLA School of Design and Texas A&M University.
Series editor and author Michael Ford is a senior technical animator at Sony Pictures Imageworks and co-founder of Animation Foundation. A graduate of UCLAs School of Design, he has since worked on numerous feature and commercial projects at ILM, Centropolis FX and Digital Magic. He has lectured at the UCLA School of Design, USC, DeAnza College and San Francisco Academy of Art College.


