VFXWorld presents a new excerpt from Building Interactive Worlds in 3D by Jean-Marc Gauthier. This month we present a tutorial in materials and textures from the Basic 3D Kit.

This is the next in a series of excerpts from Building Interactive Worlds in 3D by Jean-Marc Gauthier. For the next few months, we will be present chapters from a section entitled The Basic 3D Kit.
Lets apply colors and textures to the character.
To Open the Hypershade Window
Go to the top menu, select Window > Rendering Editor > Hypershade. The Hypershade window contains the library of materials, textures, and utilities. 3D objects with surfaces require the creation of a material to receive a texture. When a new surface is created, Maya assigns a gray Lambert material by default to the surface.
You can customize your own materials and assign them to various surfaces of your project. In the case of this tutorial, we are using only image-based materials and textures. Maya can also use shaders, which are materials using code to describe the way the surface of the 3D model is rendered.
To create a new material for the eye, open the Hypershade window. (To open the Hypershade window, go to the top menu, select Window > Rendering Editor > Hypershade.)
Go to the menu with materials and texturing tools found on the left side of the Hypershade window. Select Surface > Blinn. This material has a shinier surface, which is more appropriate for the skin than Lambert. The new material will be added to the library under the Material Tab. Double click on the Blinn material to open the Attribute Editor. The Attribute Editor lets you edit most of the information and attributes of any 3D object in the scene including shapes, cameras, lights, materials and shaders. In this case, the Attribute Editor displays Color, Transparency, Bump Map and other parameters for the material. The number of folders and options sometimes can be overwhelming, but we will use only a small number of parameters in these tutorials.
Lets start with adjusting the color for the characters eye.
To get the white color of the eye material, move the Color slider all the way to the right. Rename the material eyeSG after Blinn in the Attribute Editor.
You need to assign the material to the eye surface to update the color changes in the scene. To get a white sphere for the eye inside the Workspace, click with the middle mouse button over the material in the Hypershade window and drag it over the eye.
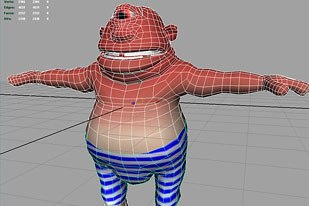
For Mr. Cyclops body texture, go to Component Mode and select the polygons for the body; assign a Lambert shader from the Create Library. Repeat the same operation for the pants, and assign a new Lambert material.
For Mr. Cyclops teeth texture, go to Component Mode and select the teeth polygons. This time you can choose a Blinn material. Press the middle mouse button and drag the material over the teeth.
Lets specify the UV mapping coordinates for every vertex of every polygonal face to apply textures to your model. UV mapping defines the corresponding coordinates of every vertex of the surface on a two-dimensional (2D) image. There are many ways to define the direction of UV mapping. You may use planar, cylindrical or spherical mapping according to the shape of the object. You will use four textures for your character: one for the eye, one for the body, one for the pants and one for the teeth.
When creating textures, I suggest creating a 256×256 pixel image in Photoshop and saving your work as a JPEG texture.
To Initialize the UV Mapping for the Eye
Go to the top menu, select Edit Polygons > Texture > Planar Mapping. Click on the check box located on the right of Planar Mapping. Using a texture with Planar Mapping on the surface of a 3D model has the same effect as projecting an image on a surface in front of the screen of a movie theater.
In the dialog window, check the options for Smart Fit and Fit to Bounding Box.
Select the perpendicular axis to the surface of the 3D model. In the case of the eye socket, the Z axis is selected. Click on Project, and the Projection Manipulator is displayed around the eye.
Previewing in the Workspace, several versions of the texture applied to the 3D model help you to find the best axis.
Lets define UV mapping for the pants. The type of projection is also Planar.
Now lets define UV mapping coordinates for the body.
The type of projection will be cylindrical. In the case of planar mapping, an image is projected in a movie theater on a round object placed in front of the screen. The image appears stretched on the sides of the round object but cannot reach the back of the object. In the case of cylindrical mapping, the image wraps around the round surface without deformation. Although we are used to planar mapping, which is similar to the effect of a slide projector, cylindrical and spherical mapping cannot be recreated with a single projector in the real world.

Choosing Textures for the Surfaces of the Character
Go to Hypershader and double click on a material of your choice. A version of the Attribute Editor is displayed for each material.
On the right of the Attribute Editor, click on the check box icon on the right of the color slider. A new dialog window called Create Render Node opens. Click on the File button and upload an image of your choice by browsing through your files.
Viewing Your Texture in the Perspective Window
On top of the Workspace window select Shading > Hardware Texturing. Assign all the textures to the different parts of the character. For the teeth you also can apply texture and initialize the UV tool from the top menu. Go to Edit Polygon > Texture. This will display the texture on all faces of the selected polygons.
Important note: Elements in the scene may have different points of origin, which is the center of the world, described as X, Y, Z = 0,0,0 in your coordinate system. This may create problems when you export the scene to Virtools. The solution to this problem is to assign the same point of origin for all 3D objects in the scene.
Select all the 3D objects by pressing Control + A keys.
Go to Modify > Freeze Transformations. The location coordinates for all the elements in the scene become X, Y, Z = 0, 0, 0.
Save your scene.
Find more turnkey tutorials that detail all the steps required to build simulations and interactions in Building Interactive Worlds in 3D: Virtual Sets and Pre-Visualization for Games, Film & the Web by Jean-Marc Gauthier: Focal Press, 2005. 422 pages with illustrations. ISBN 0-240-80622-0 ($49.95). Check back to VFXWorld frequently to read new excerpts.
Jean-Marc Gauthier teaches at New York University in the graduate studies department of Interactive Telecommunications and is the author of Interactive 3D Actors and Their Worlds(Morgan Kaufmann Publishers 2000). He is also a consultant at www.tinkering.net and an award-winning 3D artist.


