Renowned drawing instructor Glenn Vilppu continues with his third installment discussing correctly creating space while sketching on location.
This is the third in a new series of bi-monthly articles about sketching on location. The articles are based on my Sketching on Location Manual. The manual was developed as a series of lessons that I use on my guided sketching tours of Europe, and that I use as material in my regular drawing classes. As such the lessons can be part of a regular course or can be used by individual students as a practical learning guide. If you have not seen the previous lesson starting in the June 2000 issue of Animation World Magazine, it is recommended that you do. The lessons are progressive and expand on basic ideas. It is suggested that you start from the beginning for a better understanding of my approach. If you really want to begin at the beginning start with the lessons based on the Vilppu Drawing Manual.

A Sense of Space
In the last chapter we developed the "Thumbnail Sketch," now that we have learned to reduce our three dimensional world to two-dimensional shapes for a two-dimensional surface, we will develop a series of ways to create the illusion of three dimensions on a flat surface. The first step in creating this sense of space is organizing it.

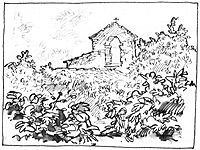
The most universal approach is to separate the various elements into foreground, middle ground and background (see figure 1 and 2). This is similar to the front of the stage (downstage), the middle of the stage (midstage) and the background (upstage) in the theatre.
Start with thumbnails like we used in the previous lesson, but now separate the elements into planes, as they are usually referred to. To show these planes, we can separate them by actually using different materials for each one -- pencil for one, ballpoint for another and ink for a third. Look at the following illustrations to see the effect.
This concept of planes will be a basic element in the next lessons. A plane parallel to the picture plane, in contrast to planes that recede into the picture, is one of the basic elements in discussing periods of art and individual works within these periods.
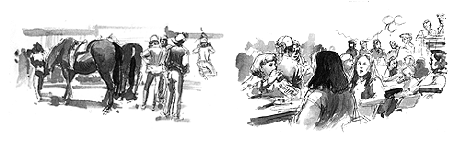
The thumbnail can now be expanded, blocking in the overall composition, and then developing its parts and organizing the space by the use of planes. In the examples, I have separated the planes by using different materials for each one. In the first example, I have used pencil in the background, ballpoint pen in the middleground and a fountain pen in the foreground, as I suggested earlier. The different colors in the originals give an even greater degree of separation than the illustrations indicate.
In figure 3 I have taken the previous illustration and simply outlined the middleground and the foreground to give them an even greater degree of separation. This is a simple device that has been used for hundreds of years. In the Uffizi gallery in Florence, Italy, look carefully at Michelangelo's oval painting of the Holy Family and you will see that the group of figures has been carefully outlined to separate them from the background. The Art Nouveau artist Alphonse Mucha, and the many artists he influenced, give us other good examples of the use of outline to separate elements within a picture.

The above drawing (figure 4) was done using a ballpoint pen for the background, fountain pen for the middleground and soft charcoal for the foreground.
In the animation industry this simple method, which uses different materials, including colored pencils, is employed as a way to separate various levels of animation in the developmental stages of designing scenes.
Other Techniques
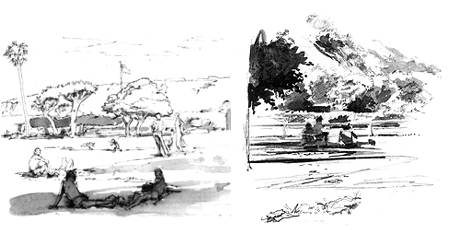
In figures 5 and 6 I am not using different materials to separate the planes. In the one below, notice that the foreground plane is distinguished by the table that recedes into the background, and yet is not parallel to the picture plane. You still get a strong separation of elements created by the scale differences of the foreground and background figures. In the drawing above, besides by the emphasis of differences in scale, you also get a strong feeling of depth by the way the shadow and general tones pass behind the foreground.

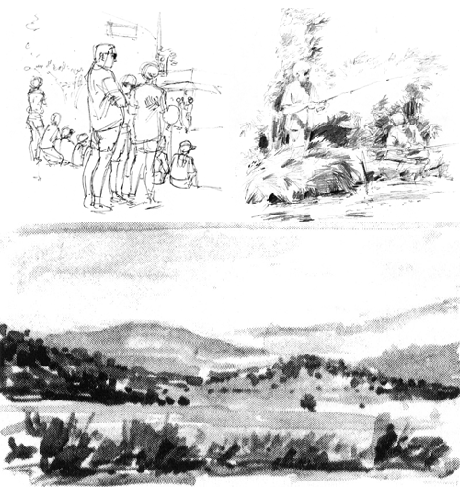
In the drawing above (figure 7) I have used the strong concentration of light as a way of separating foreground from background, in addition to using the well-defined horizontals to give a sense of overlapping depth. In figure 8, the sense of scale between the figure in front compared to those in the back effectively separates the planes.
In figure 9 and 10, I have used large open spaces to create depth and separation between the planes. In the drawing on the top of the next page, you see the combination of the strong diagonal of the wall with a horizontal shadow, plus a large empty space which gives a clear separation of planes.
The segments of the wall along with the strong perspective carry the viewer's eye from the foreground to the background.
In figures 11, 12 and 13, I have used the basic elements that we have discussed earlier for creating and organizing space, with the exception of using different materials for the planes. In the above, I used scale, where a row of figures has passed behind the foreground figures. In the drawing here on the left, there is a clear separation of foreground, not only by scale but also by the use of clear empty space between the planes. In the drawing on the right, space is produced by strong horizontals created by the separation of the water and the bank, as well as by the dark shadow passing behind the figure. This alternating dark and light pattern (as I'm sure you have noticed in the previous chapter's thumbnails and in this drawing) is a strong instrument for creating space. In the next chapter we will go into this further.
Glenn Vilppu teaches figure drawing at the American Animation Institute, the Masters program of the UCLA Animation Department, Walt Disney Feature Animation and Warner Bros. Feature Animation, and has been sent to teach artists at Disney TV studios in Japan, Canada and the Philippines. Vilppu has also worked in the animation industry for 18 years as a layout, storyboard and presentation artist. His drawing manual and video tapes are being used worldwide as course materials for animation students.
Glenn Vilppu first wrote for Animation World Magazine in the June 1997 issue, "Never Underestimate the Power of Life Drawing." His drawing manuals and video tapes may be purchased in the Animation World Store.


