Renowned drawing instructor Glenn Vilppu continues with his fourth installment discussing how to use light and dark patterns to create depth and perspective while sketching on location.
This is the fourth in a new series of bi-monthly articles about sketching on location. The articles are based on my Sketching on Location Manual. The manual was developed as a series of lessons that I use on my guided sketching tours of Europe, and that I use as material in my regular drawing classes. As such the lessons can be part of a regular course or can be used by individual students as a practical learning guide. In the last chapter we worked on "Organizing and Creating Space." If you have not seen the previous lessons starting in the June 2000 issue of Animation World Magazine, it is recommended that you do. The lessons are progressive and expand on basic ideas. It is suggested that you start from the beginning for a better understanding of my approach. If you really want to start at the beginning open with the lessons based on the Vilppu Drawing Manual.

Dark and Light Patterns
Now that you see your subjects as a series of planes in space, one of the most dramatic and useful ways of expressing them is by seeing them as alternating in darkness and lightness. Visualize shadows being cast from outside of the picture, throwing these planes alternately in shadow and light. This is one of the most useful and traditional means of creating depth in your picture. Look at the examples and compare the drawings with shadows added to those without shadows. The example in figure 1 is the drawing of an abandoned church from the previous chapter.
In the two other examples (figure 2 and figure 3), you will notice that I changed the order of the light and dark pattern. Instead of going from dark to light, I went from light to dark and then light again. Remember, "There are no rules, just tools." The point is to create a sense of depth by separating the planes in space by the use of shadows. Be careful, and don't confuse dark shaped objects with shadows.
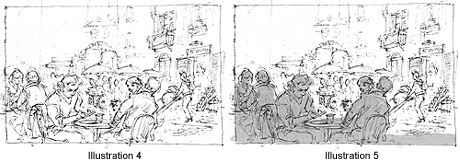
Figures 4 and 5 are another set of examples where I have used different patterns to separate the planes. You don't have to accept the way the light is on the subject; you can make the light come from any direction you wish. These drawings, as well as the ones in figure 1, 2 and 3, were done in line only, with the wash added later. When I did the drawing in figure 6 and 7, I was giving a lecture to explain the use of planes and shadows which create a more dramatic and spatial picture.
Compare these drawings to see how the tone adds depth and gives a more complete feeling. Go back and look at the drawings in the previous chapters and see where I have been using this tool. This is one of the most practical and useful tools an artist can have to give the illusion of space.
Glenn Vilppu teaches figure drawing at the American Animation Institute, the Masters program of the UCLA Animation Dept., Walt Disney Feature Animation and Warner Bros. Feature Animation, and has been sent to teach artists at Disney TV studios in Japan, Canada and the Philippines. Vilppu has also worked in the animation industry for 18 years as a layout, storyboard and presentation artist. His drawing manual and video tapes are being used worldwide as course materials for animation students.
Glenn Vilppu first wrote for Animation World Magazine in the June 1997 issue, "Never Underestimate the Power of Life Drawing." His drawing manuals and video tapes may be purchased in the Animation World Store.


